27 Apr 2022
Like all programming there are many ways to solve any problem and I saw a comment that had a pretty neat, more Excelesque way (I think - I’m not an Excel user) of solving the problem.
To drive home the benefit of testing this post adds a couple of tests to the current approach, then I’ll rewrite the solution entirely but keep the tests the same.
If all goes well the formula will be completely different but my level of confidence in the calculation will still be high as it satisfies my assumptions that I encoded in some tests.
Let’s add some tests
For a post that was about testing I shockingly didn’t test the final formula 🤦🏼♂️, which currently looks like this
=Pair.First(REDUCE(PairMake(0,Data!A1),Data!A1:Data!A2000,NextPartialResult))
The PairMake function and NextPartialResult function had tests written but the whole thing did not.
Therefore it’s not safe for me to just change the above formula until I get it behind some tests.
For testing this I’m going to use my current data set and pick different slices of it to produce different results from the formula:
| |
A (Formula) |
A (Result) |
B |
C (Formula) |
C (Result) |
D |
E |
F |
| 1 |
Actual |
Actual |
Expected |
Result |
Result |
Result Text |
|
199 |
| 2 |
=SolveTask1(F1:F10) |
7 |
7 |
=Assert.Equals(B2,C2) |
✅ |
|
|
200 |
| 3 |
=SolveTask1(F8:F10) |
1 |
1 |
=Assert.Equals(B3,C3) |
✅ |
|
|
208 |
| 4 |
=SolveTask1(F3:F10) |
5 |
5 |
=Assert.Equals(B4,C4) |
✅ |
|
|
210 |
| 5 |
|
|
|
|
|
|
|
200 |
| 6 |
|
|
|
|
|
|
|
207 |
| 7 |
|
|
|
|
|
|
|
240 |
| 8 |
|
|
|
|
|
|
|
269 |
| 9 |
|
|
|
|
|
|
|
260 |
| 10 |
|
|
|
|
|
|
|
263 |
With the above I can massage my original solution into a named function called SolveTask1 (naming is hard) that will make all the above tests pass.
SolveTask1 = LAMBDA(range,
    Pair.First(REDUCE(PairMake(0,OFFSET(range,0,0,1)),range,NextPartialResult))
);
Throw everything away and write again
With these tests in place I have a level of confidence that if I call SolveTask1 then it should behave as long as I keep the same tests.
The solution I’m going to implement (there could be many more) is based on a comment from twobitshifter who suggested ={SUM(—-(A1:A1999<A2:2000)}.
If I rejig the suggested formula to work in a named function I come up with the following that also passes my tests
SolveTask1 = LAMBDA(range,
    SUM(--(OFFSET(range,0,0,ROWS(range) - 1)<OFFSET(range,1,0,ROWS(range) - 1)))
);
This is a real improvement as I’ve got my final calculation behind some tests that gives me confidence.
It also means I can delete all the old tests from my previous post and remove the NextPartialResult helper function entirely - throwing code away is a good thing as less code = less bugs.
Of course we don’t have to stop right there, I might look at the solution above and not be happy about the duplication of ROWS(range) - 1.
Because this is all tested I can very quickly introduce a LET and as all of my tests still pass I know I didn’t fudge something up whilst making the change.
SolveTask1 = LAMBDA(range,
    LET(
        sliceSize, ROWS(range) - 1,
        SUM(--(OFFSET(range,0,0,sliceSize)<OFFSET(range,1,0,sliceSize)))
    )
);
Conclusion
I was able to take a working formula and change it a few times without worrying if I was going to break anything.
The first change was a complete rewrite and change of approach and the second change was more of an iterative improvement.
Having the tests present gave me the confidence to make broad changes without needing to go and do a load of manual verification or to spend forever statically analysing the code to guess that it still works.
25 Apr 2022
For some reason I decided it would be fun to attempt Day 1 of the Advent of Code 2021 using Excel’s Lambdas, whilst unit testing as I go - here’s how that went.
The challenge can be summarised as - go through a list of values and keep track how many times the latest value is larger than the value before it.
For example given this list:
199
200
208
210
200
207
240
269
260
263
We can step through the values observing whether the value increased or decreased
199 (N/A - no previous measurement)
200 (increased)
208 (increased)
210 (increased)
200 (decreased)
207 (increased)
240 (increased)
269 (increased)
260 (decreased)
263 (increased)
Our task is to tally how many times the value increased - in the above that would be 7.
Reduce a list to a single value
In order to perform the calculation I’m going to need to use Excel’s REDUCE function.
REDUCE takes an initial value, the range we want to enumerate and a LAMBDA that is used to combine the values together.
A small worked example might help
=REDUCE(0, {1,2,3}, LAMBDA(acc, value, acc + value))
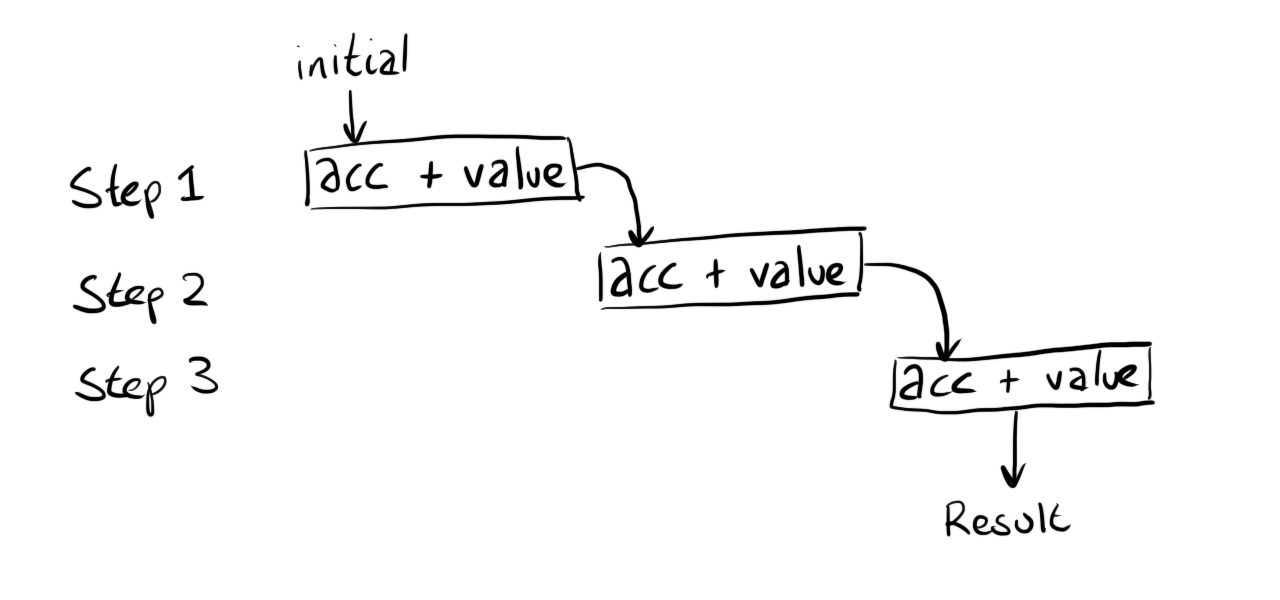
The expression above will evaluate to 6 but let’s try and visualise what is happening.
We have 3 items in our array which means that the combining function is going to be called 3 times - I can show this with some boxes representing each step:

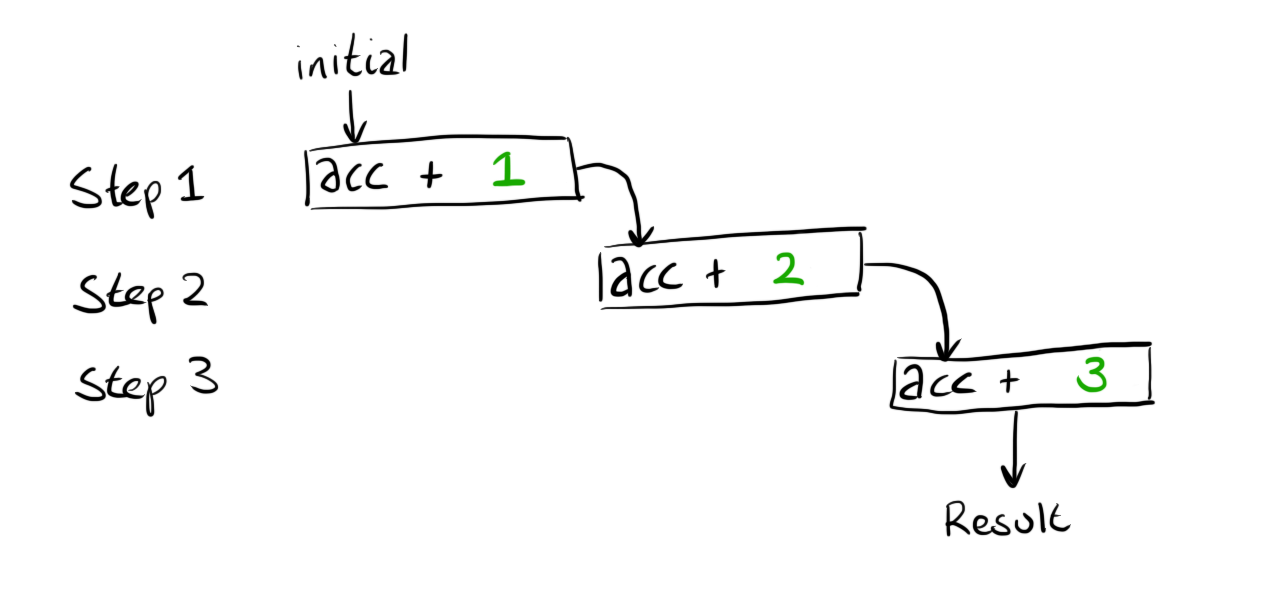
If we substitute the values that were passed to the function ({1,2,3}) the diagram looks like this:

We can’t compute the result because the first calculation still needs a value for acc.
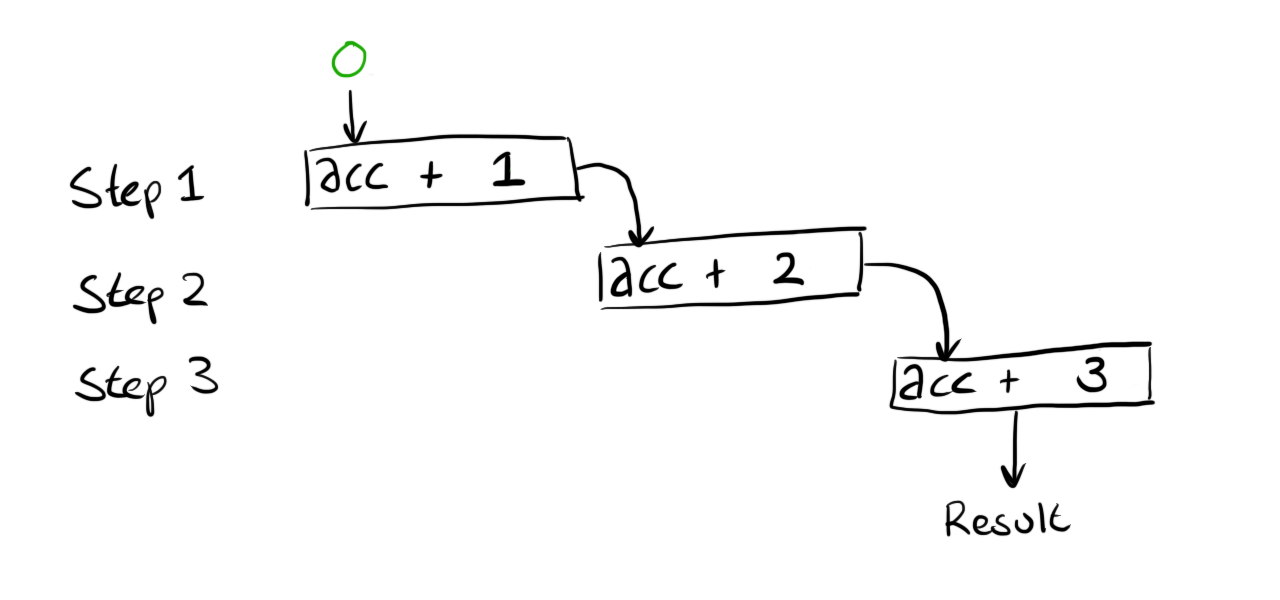
This value is provided as the first argument to our call to REDUCE which gives this:

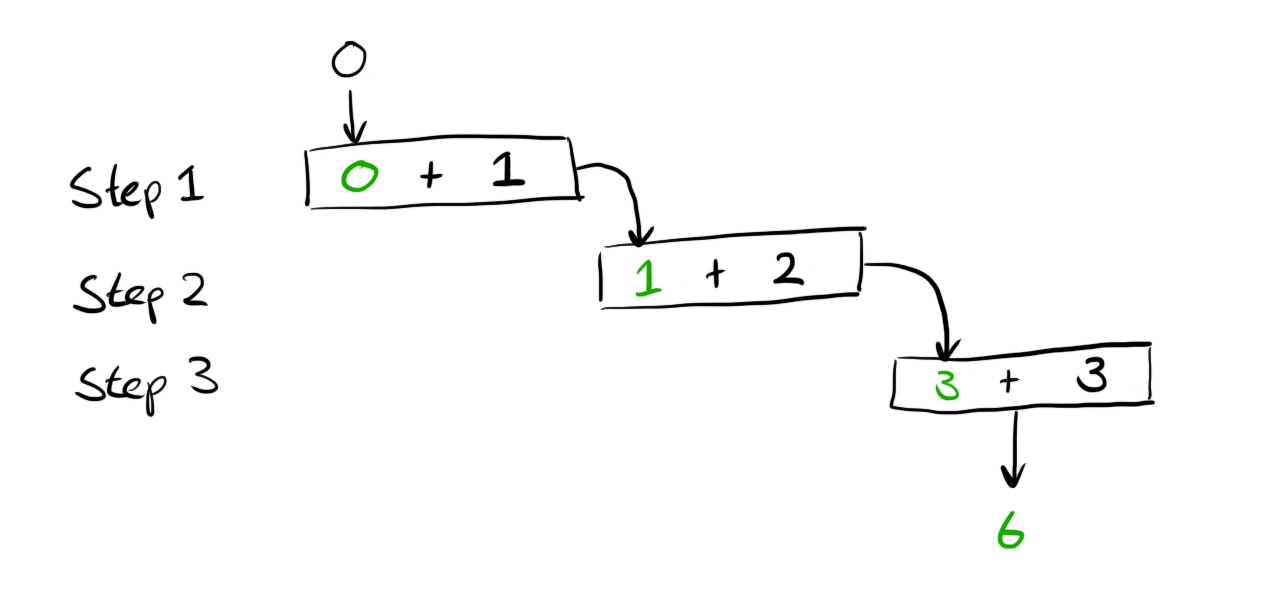
Finally we can perform all the calculations and get the final result of 6.

The above example is obviously not something we’d want to ever use, especially as it’s a long winded way of writing =SUM(1,2,3) but it shows how REDUCE is performing all the iteration for us and we just have to provide a combining function to tailor the behaviour.
Working around single value returns
Unfortunately REDUCE alone won’t quite get us what we need.
When we iterate over the list we actually need to keep track of two pieces of data, the current count of increments and the previous value we’ve seen.
As seen above REDUCE only keeps track of a single value in the variable we called acc.
The way I’m going to work around this restriction is to create a Pair abstraction.
I’m going to create a few helper functions that work on arrays with the expectation that the array only ever has 2 elements.
I’ll start by writing some tests for these functions in a new sheet called PairTests.
| |
A (Formula) |
A (Result) |
B |
C (Formula) |
C (Result) |
| 1 |
Actual |
Actual |
Expected |
Result |
Result |
| 2 |
=ARRAYTOTEXT(PairMake(0,0)) |
0, 0 |
0, 0 |
=Assert.Equals(B2,C2) |
|
| 3 |
=ARRAYTOTEXT(PairMake(0,1)) |
0, 1 |
0, 1 |
=Assert.Equals(B3,C3) |
|
| 4 |
=ARRAYTOTEXT(PairMake(1,1)) |
1, 1 |
1, 1 |
=Assert.Equals(B4,C4) |
|
The above tests are verifying that a function called PairMake can create arrays correctly.
*I’m using ARRAYTOTEXT to make the assertion a little easier to write
**Naming is hard and PairMake is the best I could come up ¯\_(ツ)_/¯
To make this test pass I can write the formula as
PairMake = lambda(x,y,MAKEARRAY(1,2,lambda(_, col,IF(col=1,x,y))));
This function mainly exists to hide all the ugly MAKEARRAY stuff - there may be much easier ways to create an array with dynamic input but my googlefu was not working and I wanted to move on.
The Assert.Equals function I’m calling is defined like this:
Assert.Equals = LAMBDA(actual, expected, if(actual=expected, "", "Expected '" & expected & "' but got '" & actual & "'"));
This does the job but because there is no output on success it is not obvious if anything is happening.
Luckily I’ve just created a Pair type so I can improve the assert function by returning pairs where the first value is a pretty emoji ✅ or ❌ and the second value is empty in the success case or the helpful error message in the failure case.
Assert.Equals = LAMBDA(actual, expected, if(actual=expected, PairMake("✅",""), PairMake("❌","Expected '" & expected & "' but got '" & actual & "'")));
After refreshing the previous table now looks healthier and shows some calculation is actually being done
| |
A (Formula) |
A (Result) |
B |
C (Formula) |
C (Result) |
| 1 |
Actual |
Actual |
Expected |
Result |
Result |
| 2 |
=ARRAYTOTEXT(PairMake(0,0)) |
0, 0 |
0, 0 |
=Assert.Equals(B2,C2) |
✅ |
| 3 |
=ARRAYTOTEXT(PairMake(0,1)) |
0, 1 |
0, 1 |
=Assert.Equals(B3,C3) |
✅ |
| 4 |
=ARRAYTOTEXT(PairMake(1,1)) |
1, 1 |
1, 1 |
=Assert.Equals(B4,C4) |
✅ |
Next up I want to define two more functions to complete the illusion that I have a Pair and hide the fact that I’m just using an Array.
| |
A (Formula) |
A (Result) |
B |
C (Formula) |
C (Result) |
| 1 |
Actual |
Actual |
Expected |
Result |
Result |
| 2 |
=Pair.First({“first”,”second”}) |
first |
first |
=Assert.Equals(B2,C2) |
✅ |
| 3 |
=Pair.Second({“first”,”second”}) |
second |
second |
=Assert.Equals(B3,C3) |
✅ |
Having functions to grab both the elements from the Pair means I don’t need to mess with INDEX everywhere and ruin the illusion that I have an honest Pair type.
Under the hood these functions do in fact just use INDEX
Pair.First = lambda(pair,INDEX(pair,1));
Pair.Second = lambda(pair,INDEX(pair,2));
Actually solving the challenge
The above was a lot of scaffolding/understanding that means we are now able to get to the task at hand.
As a recap we are going to use REDUCE to iterate over some data, whilst iterating we are going to keep track of the current count of increases and the previous value we are working with.
Once the iteration is done we can discard the previous value and just pluck out the count we have been accumulating.
Assuming the data is contained in a sheet named Data let’s see how this all looks plumbed together
=Pair.First(
  REDUCE(
    PairMake(0,Data!A1),
    Data!A1:Data!A10,
    ??????
  )
)
Our reduce is going to produce a Pair where the first element is the count and the second element is the previous value.
We don’t care about the previous element at the end of our calculation so we just pluck out the first value by wrapping the REDUCE in a call to Pair.First.
The first argument to REDUCE is the initial value - above we are creating a Pair where the first element represents the count starting at 0.
The second element represents the previous value, which we are setting to the first value in the list.
This is because if you look at the problem example at the top of this post the first item does not count as an increment as there was no previous value.
The second argument to REDUCE is the data range - nothing to explain here.
The third argument is MIA.
I’ve jumped ahead too much and we probably need to figure out the behaviour of this combining function by writing some tests.
The combining function
The combining function will be called for each element in the array.
Each time we will have available the count of increments + the previous value wrapped in a pair and the current value.
The combining function needs to figure out if the increasing count needs incrementing and then it always needs to return the current value.
These two pieces of information are then fed into the next round of calculation and so on until we reach the end of our collection.
We can express these requirements with 3 tests:
| |
A (Formula) |
A (Result) |
B |
C (Formula) |
C (Result) |
| 1 |
Actual |
Actual |
Expected |
Result |
Result |
| 2 |
=ARRAYTOTEXT(NextPartialResult({0,0},1)) |
1, 1 |
1, 1 |
=Assert.Equals(B2,C2) |
|
| 3 |
=ARRAYTOTEXT(NextPartialResult({0,1},1)) |
0, 1 |
0, 1 |
=Assert.Equals(B3,C3) |
|
| 4 |
=ARRAYTOTEXT(NextPartialResult({1,2},1)) |
1, 1 |
1, 1 |
=Assert.Equals(B4,C4) |
|
The test in Row 2 checks that the count is incremented when the current value is bigger than the previous.
The test in Row 3 checks that the count is not incremented when the current value is equal to the previous.
The test in Row 4 checks that the count is not incremented when the current value is less than the previous.
A function that satisfies these tests could look like this
NextPartialResult = LAMBDA(acc, value,
    Let(
        count, Pair.First(acc),
        previous, Pair.Second(acc),
        if(
            previous<value,
            PairMake(count+1,value),
            PairMake(count,value)
        )
    )
);
Plumbing it all together
With all the above we can now complete the task by filling out the ?????? in our previous attempt
=Pair.First(
  REDUCE(
    PairMake(0,Data!A1),
    Data!A1:Data!A10,
    NextPartialResult
  )
)
We can now sit back and marvel at the glowing number 7 that we could have calculated by hand on such a small data set with considerably less effort.
Thankfully the actual challenge has a data set with 2000 lines and seeing the work above calculate correctly against the full data set is much more rewarding.
If you got this far and you are thinking that you could solve the problem in a simpler way using a different formula then check out the next post where I do exactly that but in a controlled way using tests to ensure a completely different formula behaves identically.
24 Apr 2022
Disclaimer: I do not personally use Excel for anything so this may be completely useless but it was an interesting exploration for me.
Excel added a LAMBDA function, which allows you to define your own functions without diving into the complexity of learning a new programming language (VBA) and worrying about increased security permissions to run your workbook.
A quick google for “Unit testing in Excel” doesn’t come up with many interesting results which suggests it’s not a common practice but I wonder with the introduction of LAMBDA if this is something that could be more accessible to people.
The problem
Let’s start with an expression that prints a greeting and includes the name of the person to greet from a cell.
| |
A |
B (Formula) |
B (Result) |
| 1 |
Elliot |
="Hello, " & A1 |
Hello, Elliot |
| 2 |
Louise |
="Hello, " & A2 |
Hello, Louise |
| 3 |
Paul |
="Hello, " & A3 |
Hello, Paul |
| 4 |
Ruby |
="Hello, " & A4 |
Hello, Ruby |
The formula being repeated (even though simple) doesn’t sit right with me as there are many possible ways I can mess this up.
The idea of DRY (Don’t Repeat Yourself) is being violated and it feels like this expression is a bit adhoc when maybe there is a named concept I could use instead.
The other issue is that there is no validation that I wrote this function correct in the first instance or any of the places it is duplicated.
Having someone review my formula just confirms that someone else assumes my formula is valid but there is no proof that it calculates as expected.
Taking the time to give this expression a name means there will be one authoritative place where this logic is defined, it’s easy to change and know that all uses will be updated.
Also if the naming is done well it will communicate intent without later readers needing to parse the formula to understand what calculation is being done.
Let’s go step by step to test driving a new function that will replace the inlined expressions above.
Setting up a basic test function
To test drive the function I’m going to need some way to repeatedly verify that the behaviour is correct as I iterate the development of my GREETING function.
I’m going to create an assertion function that will check that evaluating a formula returns an expected value and print a helpful error if not.
I’m going to start with nothing more complicated than this (using the “Editor” mode in the Advanced Formula Environment)
Assert.Equals = LAMBDA(actual, expected, if(actual=expected, "", "Expected '" & expected & "' but got '" & actual & "'"));
Let’s try this out to see if it behaves as expected
| |
A (Formula) |
A (Result) |
B |
C (Formula) |
C (Result) |
| 1 |
Actual |
Actual |
Expected |
Result |
Result |
| 2 |
=1+1 |
2 |
2 |
=Assert.Equals(B2,C2) |
|
| 3 |
=1 |
1 |
2 |
=Assert.Equals(B3,C3) |
Expected ‘2’ but got ‘1’ |
In the above we can see that for Row 2 the Actual and Expected match so the Result is left clear (we don’t want to make noise when things are working).
In Row 3 the Actual and Expected don’t match so we print an error stating what went wrong.
There are probably better ways to structure the above but it will do for my example.
We have a mechanism where we can build up examples across different inputs/outputs and check that the behaviour is as expected.
Test Driving GREETING
Now we have an assertion let’s turn back to our GREETING function.
I’ll start by setting up the assertion for a basic example:
| |
A (Formula) |
A (Result) |
B |
C (Formula) |
C (Result) |
| 1 |
Actual |
Actual |
Expected |
Result |
Result |
| 2 |
=GREETING("Paul") |
#NAME? |
Hello, Paul |
=Assert.Equals(B2,C2) |
#NAME? |
The first failure I get isn’t related to logic as we haven’t defined the GREETING function yet so we are getting a name error.
I’ll define a stub function so that the error is related to logic and not a missing function.
GREETING = LAMBDA(name, "");
With this my error moves as expected
| |
A (Formula) |
A (Result) |
B |
C (Formula) |
C (Result) |
| 1 |
Actual |
Actual |
Expected |
Result |
Result |
| 2 |
=GREETING("Paul") |
|
Hello, Paul |
=Assert.Equals(B2,C2) |
Expected ‘“Hello, Paul”’ but got ‘’ |
For the sake of following every introductory TDD (Test Driven Development) text I’m going to do the pointless task of making this test pass with a silly implementation (please don’t scream at your screen).
GREETING = LAMBDA(name, "Hello, Paul");
Now the test passes
| |
A (Formula) |
A (Result) |
B |
C (Formula) |
C (Result) |
| 1 |
Actual |
Actual |
Expected |
Result |
Result |
| 2 |
=GREETING("Paul") |
Hello, Paul |
Hello, Paul |
=Assert.Equals(B2,C2) |
|
With a passing test we can now introduce another example that will fail in row 3
| |
A (Formula) |
A (Result) |
B |
C (Formula) |
C (Result) |
| 1 |
Actual |
Actual |
Expected |
Result |
Result |
| 2 |
=GREETING("Paul") |
Hello, Paul |
Hello, Paul |
=Assert.Equals(B2,C2) |
|
| 3 |
=GREETING("Elliot") |
Hello, Paul |
Hello, Elliot |
=Assert.Equals(B3,C3) |
Expected ‘“Hello, Elliot”’ but got ‘Hello, Paul’ |
At this point we can reintroduce the original formula to get the expected behaviour
GREETING = LAMBDA(name, "Hello, " & name);
| |
A (Formula) |
A (Result) |
B |
C (Formula) |
C (Result) |
| 1 |
Actual |
Actual |
Expected |
Result |
Result |
| 2 |
=GREETING("Paul") |
Hello, Paul |
Hello, Paul |
=Assert.Equals(B2,C2) |
|
| 3 |
=GREETING("Elliot") |
Hello, Elliot |
Hello, Elliot |
=Assert.Equals(B3,C3) |
|
Digging deeper
The above might seem like a long way to get the same result but before we continue let’s just take stock of what we have done.
- Introduced a named concept “GREETING”
- Added two examples to check the function behaves as expected
- This alerts us to changes to the function that will have unintended consequences
- The examples also act as documentation for future readers to understand the original authors intent when writing the expression
Let’s make one further expansion that makes the greeting slightly more complicated, which we can now do safe in the knowledge if we break existing behaviour our test will fail.
We want to remove the “name” from the greeting if it is empty - we start by adding a failing test.
| |
A (Formula) |
A (Result) |
B |
C (Formula) |
C (Result) |
| 1 |
Actual |
Actual |
Expected |
Result |
Result |
| 2 |
=GREETING("Paul") |
Hello, Paul |
Hello, Paul |
=Assert.Equals(B2,C2) |
|
| 3 |
=GREETING("Elliot") |
Hello, Elliot |
Hello, Elliot |
=Assert.Equals(B3,C3) |
|
| 4 |
=GREETING("") |
“Hello, “ |
Hello |
=Assert.Equals(B4,C4) |
Expected ‘Hello’ but got ‘Hello, ‘ |
We can get the new test passing by updating our function
GREETING = LAMBDA(name, if(name="", "Hello", "Hello, " & name));
| |
A (Formula) |
A (Result) |
B |
C (Formula) |
C (Result) |
| 1 |
Actual |
Actual |
Expected |
Result |
Result |
| 2 |
=GREETING("Paul") |
Hello, Paul |
Hello, Paul |
=Assert.Equals(B2,C2) |
|
| 3 |
=GREETING("Elliot") |
Hello, Elliot |
Hello, Elliot |
=Assert.Equals(B3,C3) |
|
| 4 |
=GREETING("") |
Hello |
Hello |
=Assert.Equals(B4,C4) |
|
This is great we introduced new behaviour and we can provably say that our existing expectations have not been effected.
Although the final function is still fairly simple I think copying this in all rows like we had in the beginning adds more mental overhead for future readers than I’d personally feel comfortable with and allow mistakes/typos to sneak in.
Conclusion
¯\_(ツ)_/¯ I’m not an Excel user so I’m not sure how useful this is but it seems like a way to introduce some good software development practices into a space where it might not have previously been so easy to do.


