02 Feb 2026
Every now and then when I’m out walking my dog I nerd snipe myself and start thinking of interesting little programming challenges to toy around with.
This post explores using Ktor to build a tiny reverse proxy that forwards Snowplow events and pushes notifications over WebSockets so a debug UI can react in real time.
Background
The app I work on uses Snowplow for event tracking.
When you send events, the payload has to adhere to strict JSON schemas.
When you send an event with the right structure then everything is good, but if you get the structure wrong then the validation kicks in and events are lost to a bad queue.
Snowplow provides a debug collector that you can run locally and it will give you good information about whether the events you are sending are valid or not.
The issue I was toying with is that the app I want to use to observe the debug collector doesn’t know when new data is available in order to update its UI.
The service structure looks something like this:
+-----+   sends events   +-----------+    needs to update   +-----------+
| iOS |----------------->| Collector |<---------------------| Debug GUI |
+-----+                  +-----------+                      +-----------+
The Debug GUI is a small local tool we plan to write to inspect what the collector has received, but it currently has no way of knowing when new data arrives.
For the sake of my experiment I had the limitation that I cannot change the code in iOS or the Collector.
It’s not cheating but the iOS client already has the ability to change the location of the Collector so I can point traffic where I want.
A couple of less fun solutions that would work would be:
- Manual - add a refresh button to the
Debug GUI
- Noisy - add polling to the
Debug GUI
I opted to explore option 3 as noted at the top of the post, which is to create a reverse proxy to sit in the middle and be able to observe when events occur and push them to the Debug GUI.
This looks something like this
+-----+   sends events   +-------+   forwards   +-----------+
| iOS |----------------->| Proxy |------------->| Collector |
+-----+                  +-------+              +-----------+
                             |
                             |  sends messages  +-----------+
                             '----------------->| Debug GUI |
                                                +-----------+
With a rough structure to aim for I started experimenting.
Creating a basic proxy
I’m not aiming for production readiness as this is only for a local debugging tool but I started with a new empty project and manually added all the ktor bits I would need.
As a start I know I’ll need both client and server libraries for Ktor and as I know I’ll be using WebSockets I looked ahead at the docs and noticed they were suggesting to use Netty for WebSocket support.
The basic configuration then looks like this:
gradle/libs.versions.toml
[versions]
ktor = "3.4.0"

[libraries]
ktor-client-cio = { module = "io.ktor:ktor-client-cio", version.ref = "ktor" }
ktor-client-core = { module = "io.ktor:ktor-client-core", version.ref = "ktor" }
ktor-server-core = { module = "io.ktor:ktor-server-core", version.ref = "ktor" }
ktor-server-netty = { module = "io.ktor:ktor-server-netty", version.ref = "ktor" }

[bundles]
ktor-client = [
    "ktor-client-cio",
    "ktor-client-core",
]
ktor-server = [
    "ktor-server-core",
    "ktor-server-netty",
]
build.gradle.kts
...

dependencies {
    implementation(libs.bundles.ktor.client)
    implementation(libs.bundles.ktor.server)
}

...
With all the dependencies in place I can implement a main function that starts a server that will receive requests on port 9090 and forward them to 9091 before returning the result.
src/main/kotlin/Main.kt
fun main() {
    embeddedServer(Netty, port = 9090, host = "0.0.0.0") {
        val client = HttpClient(CIO)

        routing {
            route("{...}") {
                handle {
                    val path = call.request.uri

                    val response = client.request("http://localhost:9091$path") {
                        method = call.request.httpMethod

                        call.request.headers.forEach { key, values ->
                            values.forEach { header(key, it) }
                        }

                        setBody(call.receiveChannel())
                    }

                    call.respondBytes(
                        bytes = response.bodyAsBytes(),
                        status = response.status,
                        contentType = response.contentType()
                    )
                }
            }
        }
    }.start(wait = true)
}
The code isn’t super exciting but the high level idea is to copy the path, headers and body and construct an identical request to the service I am wrapping.
The results of calling the wrapped service are then just sent back to the original caller.
Because I forward the request body as a channel, large payloads can stream through without being buffered in memory.
After firing this up and changing my iOS client to point from port 9091 to 9090 I could see everything was working as if I’d done nothing.
This was a bit worrying as I wasn’t sure I’d actually done anything so I placed a few breakpoints to confirm my code was actually being executed.
The proxy works, but it doesn’t observe anything yet - so next I added a WebSocket endpoint that interested tools can subscribe to.
Adding WebSockets
The general idea now is to continue the existing proxying logic but instead of just returning the result I’m also going to expose a WebSocket endpoint that I will publish new data to.
To publish new data I’m going to need to be able to parse the data coming from the collector which means my dependency shopping list now includes WebSockets and json serialization.
gradle/libs.versions.toml
  [libraries]
  ktor-client-cio = { module = "io.ktor:ktor-client-cio", version.ref = "ktor" }
+ ktor-client-content-negotiation = { module = "io.ktor:ktor-client-content-negotiation", version.ref = "ktor" }
  ktor-client-core = { module = "io.ktor:ktor-client-core", version.ref = "ktor" }
+ ktor-client-serialization = { module = "io.ktor:ktor-serialization-kotlinx-json", version.ref = "ktor" }
  ktor-server-core = { module = "io.ktor:ktor-server-core", version.ref = "ktor" }
+ ktor-server-content-negotiation = { module = "io.ktor:ktor-server-content-negotiation", version.ref = "ktor" }
  ktor-server-netty = { module = "io.ktor:ktor-server-netty", version.ref = "ktor" }
+ ktor-server-websockets = { module = "io.ktor:ktor-server-websockets", version.ref = "ktor" }

+ [plugins]
+ kotlinx-serialization = { id = "org.jetbrains.kotlin.plugin.serialization", version = "2.3.0" }

  [bundles]
  ktor-client = [
      "ktor-client-cio",
+     "ktor-client-content-negotiation",
      "ktor-client-core",
+     "ktor-client-serialization"
  ]
  ktor-server = [
      "ktor-server-core",
+     "ktor-server-content-negotiation",
      "ktor-server-netty",
+     "ktor-server-websockets"
  ]
build.gradle.kts
  plugins {
      kotlin("jvm") version "2.2.21"
+     alias(libs.plugins.kotlinx.serialization)
  }

  ...
With all the dependencies installed I looked at the docs for guidance and came up with this just to verify the general setup
src/main/kotlin/Main.kt
suspend fun main() {
    embeddedServer(Netty, port = 9090, host = "0.0.0.0") {
        install(WebSockets)

        val subscribers = Collections.synchronizedList<WebSocketServerSession>(mutableListOf())

        routing {
            webSocket("/ws") {
                println("Web socket connected")
                subscribers += this

                repeat(10) {
                    send("Message $it")
                    delay(1.seconds)
                }

                try {
                    for (frame in incoming) {
                        // ignore client messages
                    }
                } finally {
                    subscribers -= this
                }

                close(CloseReason(CloseReason.Codes.NORMAL, "All done"))
            }
        }
    }.start(wait = true)
}
When this server is run and I connect to the WebSocket (I used websocat for testing) the server will print that a connection was made and then start sending Message 0-Message 9 with a second delay between each message.
This works nicely and the socket is kept open by the infinite read loop that waits for input and just throws it away on repeat.
Now I know I can do the proxying and establish WebSockets it’s time to stitch things together.
Consume and emit events
The actual collector doesn’t actually return any useful data when we inspect the traffic so in reality I will need to make a further network request to fetch data.
For the sake of this example, let’s pretend the collector returns the data directly in the response body rather than requiring a follow-up request.
I started by setting up the JSON parsing side of things.
The reason for parsing the JSON is that the payload from the collector contains a lot of stuff that the Debug GUI doesn’t need, so it makes sense to return a filtered view.
val json = Json {
    ignoreUnknownKeys = true
    explicitNulls = false
}

embeddedServer(Netty, port = 9090, host = "0.0.0.0") {
    install(WebSockets) {
        contentConverter = KotlinxWebsocketSerializationConverter(json)
    }

    install(ServerContentNegotiation) {
        json(json)
    }

    val client = HttpClient(CIO) {
        install(ContentNegotiation) {
            json(json)
        }
    }

    ...
}
The above code creates a more lenient Json instance that will ignore unknown keys as I’m not going to reconstruct the shape of the entire response.
With this created it’s wired into the ContentNegotiation plugins for the client/server.
Annoyingly because both the client and server call the plugin ContentNegotiation you need to fully qualify to have them both in one project - I opted for aliasing on the import.
Next I updated the routing to wire things together
routing {
    webSocket("/ws") {
        println("Web socket connected")
        subscribers += this
        try {
            for (frame in incoming) {
                // ignore client messages
            }
        } finally {
            subscribers -= this
        }
    }

    route("{...}") {
        handle {
            val path = call.request.uri

            val response = client.request("http://localhost:9091$path") {
                method = call.request.httpMethod

                call.request.headers.forEach { key, values ->
                    values.forEach { header(key, it) }
                }

                setBody(call.receiveChannel())
            }

            val bodyText = response.bodyAsText()
            val items = json.decodeFromString<List<Item>>(bodyText)

            val targets = synchronized(subscribers) { subscribers.toList() }
            for (subscriber in targets) {
                subscriber.sendSerialized(items)
            }

            call.respondBytes(
                bytes = bodyText.toByteArray(),
                status = response.status,
                contentType = response.contentType()
            )
        }
    }
}
With this in place I spun everything up and connected to the endpoint with websocat and started sending events and then…
Nothing, absolutely nothing was happening.
There was nothing in the logs so I slapped a break point in and stepped through things.
It turns out there was an exception being thrown on the val items = json.decodeFromString<List<Item>>(bodyText) line but because there is no configuration for logging this error was just swallowed 🤦🏼♂️.
As it happens I’d messed up the structure of my @Serializable types but it was an annoying lesson that logging was not installed.
Having to drop down to stepping through the code line by line was a tedius, so the obvious fix was to install CallLogging and an slf4j backend.
In my case that was
ktor-server-call-logging = { module = "io.ktor:ktor-server-call-logging", version.ref = "ktor" }
logback = { module = "ch.qos.logback:logback-classic", version.ref = "logback" }
With the corrected data structures I spun it up again and everything worked perfectly.
Wrap up
In the end I had a tiny Ktor service that transparently proxied Snowplow traffic and broadcast filtered events over WebSockets to any connected UI.
This was actually a fun exploration and I reckon I’ll be able to take the learnings forward.
The main take away on this one was that I should just try stuff - in the past I’ve wanted to do similar things with wrapping services but I’d assumed it would be too tricky.
The whole thing took a couple of hours of experimenting and then it was all just clicking, which just reminds me that the things I put off aren’t ever that bad if you just start.
30 Jan 2026
In this post I explore Swift’s @propertyWrappers and parameter packs to implement a common behaviour.
I ran into some code that captured work in a closure and ensured it was only invoked once.
The pattern for this one-shot closure looked like this:
class Example {
    private var delayedWork: (() -> Void)?

    func functionThatQueuesWork() {
        delayedWork = { print("some work") }
    }

    func functionThatInvokesTheWork() {
        if let delayedWork {
            self.delayedWork = nil
            delayedWork()
        }
    }
}
Upon seeing this I wondered a) if we had a helper for this pattern b) if not what could the API look like.
Basically I was nerd sniped into exploring what a reusable API could look like.
A Basic Property Wrapper
As always I find it best to start with concrete types then try and make things generic later on.
The closure above is pretty simple - it takes no arguments and returns nothing so it’s a good place to start.
A rough scaffold to get some types lined up would look like this:
@propertyWrapper class CallOnce {
    var wrappedValue: () -> Void

    init(wrappedValue: @escaping () -> Void) {
        self.wrappedValue = wrappedValue
    }
}
This compiles but doesn’t really do anything useful for us as it’s literally just wrapping a closure with no additional behaviour.
We need to mirror the previously mentioned logic, which was to store the closure then ensure it’s only called once.
We currently have storage with var wrappedValue but we need to arrange for this to be some kind of no-op after it’s been invoked.
The simplest thing I can think of is to override the setter for wrappedValue and wrap the incoming closure with the additional logic.
In order to do this we’ll need to define some backing storage.
Let’s start with storing the closure by adding some storage and just delegating to that
@propertyWrapper class CallOnce {
    private var function: () -> Void = {}

    var wrappedValue: () -> Void {
        get { function }
        set { function = newValue }
    }

    init(wrappedValue: @escaping () -> Void) {
        self.wrappedValue = wrappedValue
    }
}
Here I’ve opted to keep the wrappedValue as non optional and instead I’m just going to use a no-op instead of assigning function = nil.
To handle the functionality of changing the passed in closure to a no-op I’ll add a helper method that both init and the setter can use.
@propertyWrapper class CallOnce {
    private var function: () -> Void = {}

    var wrappedValue: () -> Void {
        get { function }
        set { decorate(newValue) }
    }

    init(wrappedValue: @escaping () -> Void) {
        decorate(wrappedValue)
    }

    private func decorate(_ function: @escaping () -> Void) {
        self.function = { [weak self] in
            defer { self?.function = {} }
            function()
        }
    }
}
I capture self weakly so the wrapper doesn’t participate in a retain cycle with the stored closure if it’s already gone, the no-op behavior is fine.
You’ll probably have noticed by now that this is making no attempt to be thread safe and accessing this property wrapper from the correct isolation context is left to the caller.
This all works great now but only for simple closure types.
Making it slightly more generic
To make this slightly more reusable we could open it up to allow any return type.
This is fairly simple to do as we just need to introduce one new generic and slot it in to any place where we currently have a return type of Void.
- @propertyWrapper class CallOnce {
-     private var function: () -> Void = { }
+ @propertyWrapper class CallOnce<Output> {
+     private var function: () -> Output? = { nil }

-     var wrappedValue: () -> Void {
+     var wrappedValue: () -> Output? {
          get { function }
          set { decorate(newValue) }
      }

-     init(wrappedValue: @escaping () -> Void) {
+     init(wrappedValue: @escaping () -> Output?) {
          decorate(wrappedValue)
      }

-     private func decorate(_ function: @escaping () -> Void) {
+     private func decorate(_ function: @escaping () -> Output?) {
          self.function = { [weak self] in
-             defer { self?.function = {} }
+             defer { self?.function = { nil } }
              return function()
          }
      }
  }
Again this is working but wouldn’t it be nice if we could support any shape of function?
Parameter packs to the rescue
The way this is going to work is that we are going to add a parameter pack in a similar way to how we added the Output generic.
Swift’s parameter packs let us abstract over an arbitrary number of parameters in a function signature.
When we introduce the generic we use the each syntax then anytime after that when we want to use them again we use repeat each.
- @propertyWrapper class CallOnce<Output> {
-     private var function: () -> Output? = { nil }
+ @propertyWrapper class CallOnce<each Argument, Output> {
+     private var function: (repeat each Argument) -> Output? = { (_: repeat each Argument) in nil }

-     var wrappedValue: () -> Output? {
+     var wrappedValue: (repeat each Argument) -> Output? {
          get { function }
          set { decorate(newValue) }
      }

-     init(wrappedValue: @escaping () -> Output?) {
+     init(wrappedValue: @escaping (repeat each Argument) -> Output?) {
          decorate(wrappedValue)
      }

-     private func decorate(_ function: @escaping () -> Output?) {
-         self.function = { [weak self] in
-             defer { self?.function = { nil } }
-             return function()
-         }
+     private func decorate(_ function: @escaping (repeat each Argument) -> Output?) {
+         self.function = { [weak self] (argument: repeat each Argument) in
+             defer { self?.function = { (_: repeat each Argument) in nil } }
+             return function(repeat each argument)
+         }
     }
  }
Without the diff markup that looks like this
@propertyWrapper class CallOnce<each Argument, Output> {
    private var function: (repeat each Argument) -> Output? = { (_: repeat each Argument) in nil }

    var wrappedValue: (repeat each Argument) -> Output? {
        get { function }
        set { decorate(newValue) }
    }

    init(wrappedValue: @escaping (repeat each Argument) -> Output?) {
        decorate(wrappedValue)
    }

    private func decorate(_ function: @escaping (repeat each Argument) -> Output?) {
        self.function = { [weak self] (argument: repeat each Argument) in
            defer { self?.function = { (_: repeat each Argument) in nil } }
            return function(repeat each argument)
        }
    }
}
This is pretty handy and can handle any shape of function now.
If we applied this to the original code we’d have this
class Example {
    @CallOnce private var delayedWork: () -> Void? = { nil }

    func functionThatQueuesWork() {
        delayedWork = { print("some work") }
    }

    func functionThatInvokesTheWork() {
        delayedWork()
    }
}
Now if we instantiate this type, enqueue some work and repeatedly invoke it we’d only see one log
The initializer syntax is a little clunky because the wrapper expects an initial closure, even if it’s just a no-op.
let example = Example()
example.functionThatQueuesWork()
example.functionThatInvokesTheWork() //=> "some work"
example.functionThatInvokesTheWork() //=> nil
example.functionThatInvokesTheWork() //=> nil
Conclusion
I’m not sure this is actually useful but it’s always a fun exercise to try and see how you can utilise different features to craft the functionality you need.
I find knowing the available primitives and having the hands on experience of piecing them together is really powerful for helping me solve problems and just generally not be phased when a challenge comes in that I’m unfamiliar with.
Even if this exact wrapper never ships, the exercise paid off by forcing me to combine property wrappers and parameter packs into something concrete.
15 Jan 2026
I spend a lot of time thinking about developer experience at all levels, from what makes a helpful error message deep in a framework to how we make people’s dev environments easy to spin up.
In this post I’ll walk through how a local development tool I wrote evolved over 4.5 years and what that taught me about designing developer facing tools.
This isn’t a post about Docker, SwiftUI or Compose.
It’s about what I learned building a developer tool that people actually used and what I got wrong along the way.
The Problem
For my day job I work in the native apps team at Autotrader on the iOS/platform side of things.
As a team we don’t only own the Android/iOS code bases, we also own a few backend services that power the apps, the number of backend services has grown over time.
This means that if you want to make changes to a backend service and test it locally in a simulator you need to spin up all the related services locally.
As a simplified example imagine this setup
+-----+     +-----------+     +-----------+
| iOS |-----| Service A |-----| Service B |
+-----+     +-----------+     +-----------+
To run this locally there are many ways I can configure things.
One scenario might be that I want to make changes to Service B, which means I still need to spin up Service A to allow the communication.
In the beginning this was all done manually - you’d load up the projects for Service A and Service B in IntelliJ and run them both locally.
This worked but it pushed both cognitive and operational complexity onto individual developers, which is exactly where DX debt hurts most.
First Solution
Some people will have been screaming “use docker compose” and you’d be right that’s what I did.
All of our services were already containerised so there was nothing to change there.
I just needed to write the docker-compose.yml to configure everything, which I did and it worked fine.
There were a few issues that made me feel uncomfortable stopping here
- Not everyone is comfortable on the command line so this can be intimidating
- Docker is possibly not a tech a lot of Android/iOS devs delve into
- The UI isn’t great
To elaborate on that last point the UI for interacting with this new setup would be one of the following:
docker compose up
docker compose up service-a
docker compose up service-b
Not everyone knows about reverse history search in bash (ctrl + r) so scraping around for these commands or pressing up a million times at the prompt isn’t the best experience.
There’s also an issue with discoverability as you’d need to know the correct spelling of each service you want to run.
It seemed pretty clear that some kind of simple UI would really reduce the barrier to entry for using this tool.
Put Some UI on it
I’d dabbled in macOS apps before and honestly not enjoyed the experience too much as all my previous experience was in UIKit.
Luckily SwiftUI exists so I thought I’d use it as a learning experience to make a menu bar app that essentially wraps the docker compose.
This is what that first version looked like
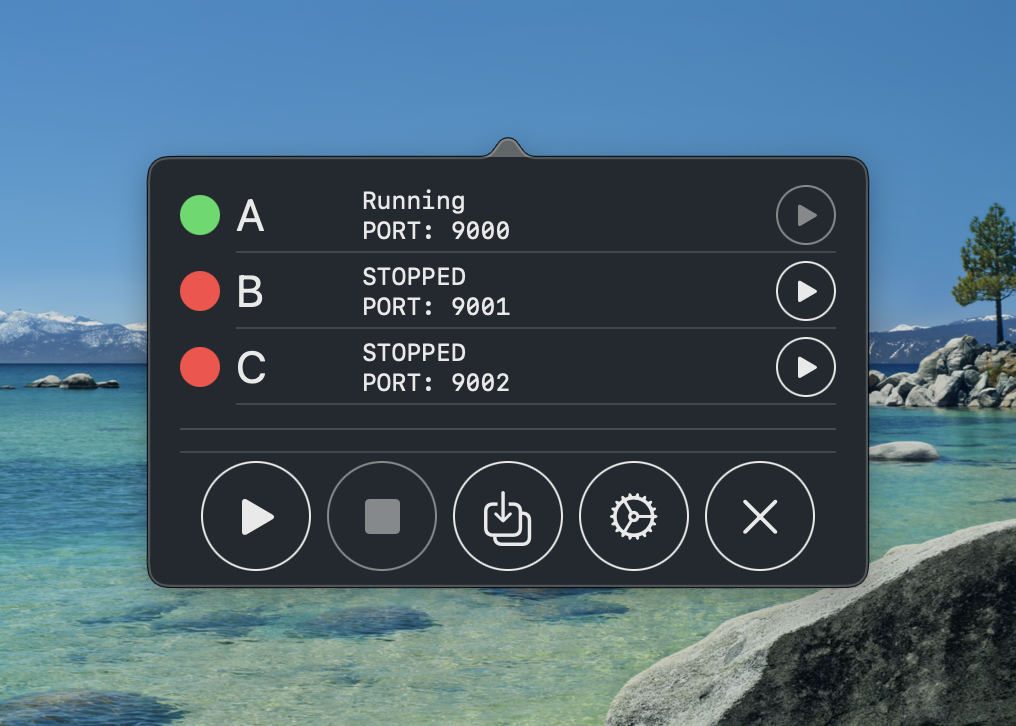
Yup it’s not going to win any design awards but the power of this abstraction can’t be overstated.
- We are completely abstracting away docker from the mobile app devs
- All available services are visible and just a button tap away from being started/stopped
- We show useful debug information like what ports things are running on
- We show the running status of each service and detect if running via docker or as .jar (read: most likely in IntelliJ)
This wasn’t a quick task and I ended up burning a lot of the midnight oil as it was an interesting task.
There were lots of gotchas with handling subprocesses and their environments and coordinating lots of state events to the UI.
I was pretty happy with this step until I realised my first mistake…
How do I install it?
The first lesson was that building a tool isn’t good enough; you need to make it accessible.
I’m not sure if it’s common knowledge but developers tend to be very lazy energy efficient and having a multi step install is just a recipe for support pain.
It wasn’t long before I added an install script so people could simply run a curl | bash and enjoy a nicely installed app without manually
- Finding the repo
- Navigating to releases
- Downloading the binary
- Doing some gatekeeper to get it out of quarantine
- Finally be able to launch the app
Obviously whenever I shared installation instructions I did the good citizen thing and issued a disclaimer that people shouldn’t blindly trust me and pipe my remotely hosted bash script into an interpreter without reading it first.
Success and Growing Pains
The tool in the form of a macOS menu bar app written in SwiftUI had a good 4 year run.
New services were added and bugs were fixed and it ended up looking more like this
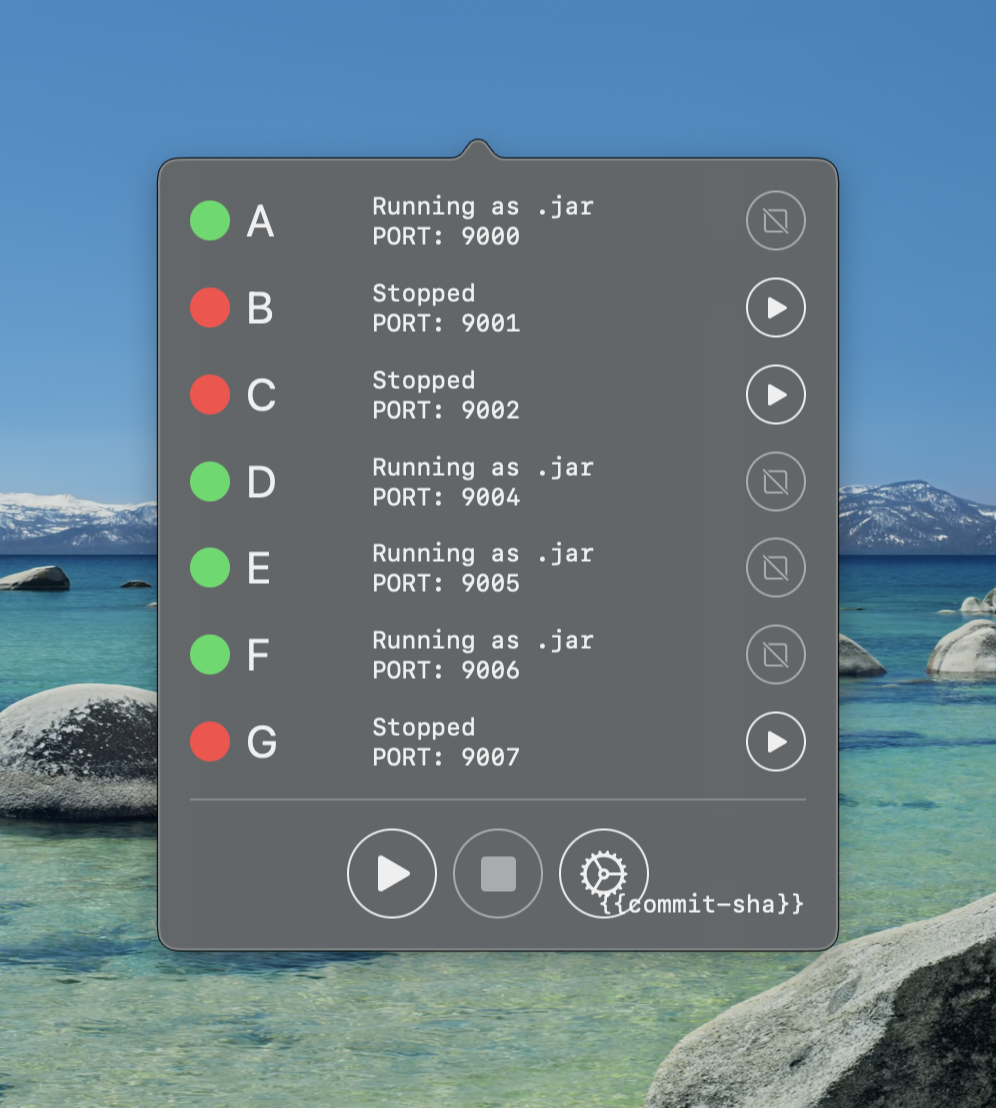
One fun lesson that you can see played out in the screen shot is that I added { {commit-sha} }, which is populated on a release build with the git sha.
This was because people have a tendency to not update things, especially when it involved manually running a curl | bash.
Although adding some version identifier was helpful for support, it was just a plaster and the actual requirement I wish I noticed earlier is that this really needed to automatically update itself.
As you can see from the growth of services the tool is popular enough to have been updated multiple times but it wasn’t popular enough to help people overcome the thought of a steep learning curve required to contribute.
The project was mostly maintained by myself and in all honesty I’d made some questionable architectural decisions early on and Combine heavy state management made the learning curve steeper than it needed to be.
Another detail that I’d started to notice with the way this had grown is that a long list of services is only good if the user knows how they relate.
In an evolving estate where many teams contribute it may not be very obvious what services you need to run to enable you to work.
You could spin up all the services but that’s sometimes overkill and hard on our poor little CPUs.
The project needed change but needed some inspiration…
A Reimagining
So here I was thinking
- This codebase is a pain to maintain
- I want to better visualise how services hang together
- I want more people to be able to contribute
- I want the tool to autoupdate
My colleague (who doesn’t like being named) was working on a Compose Desktop app to help debug our apps.
As they’d done all the hard work of getting a project scaffolded and off the ground I decided to see how hard it would be to port the SwiftUI tool to Compose, update the UI and incorporate it into this debug app.
This was actually a perfect opportunity to rethink architectural choices as it was an entirely different language and although I’d consider myself proficient in Kotlin I’d never done Compose so it would be a fun experience.
Doing the work in this codebase also opened up the contributor pool considerably as now any Android dev could contribute and conveniently all of our iOS devs are solid Kotlin devs already.
At this point, the limiting factor wasn’t UX polish - it was who felt capable of contributing.
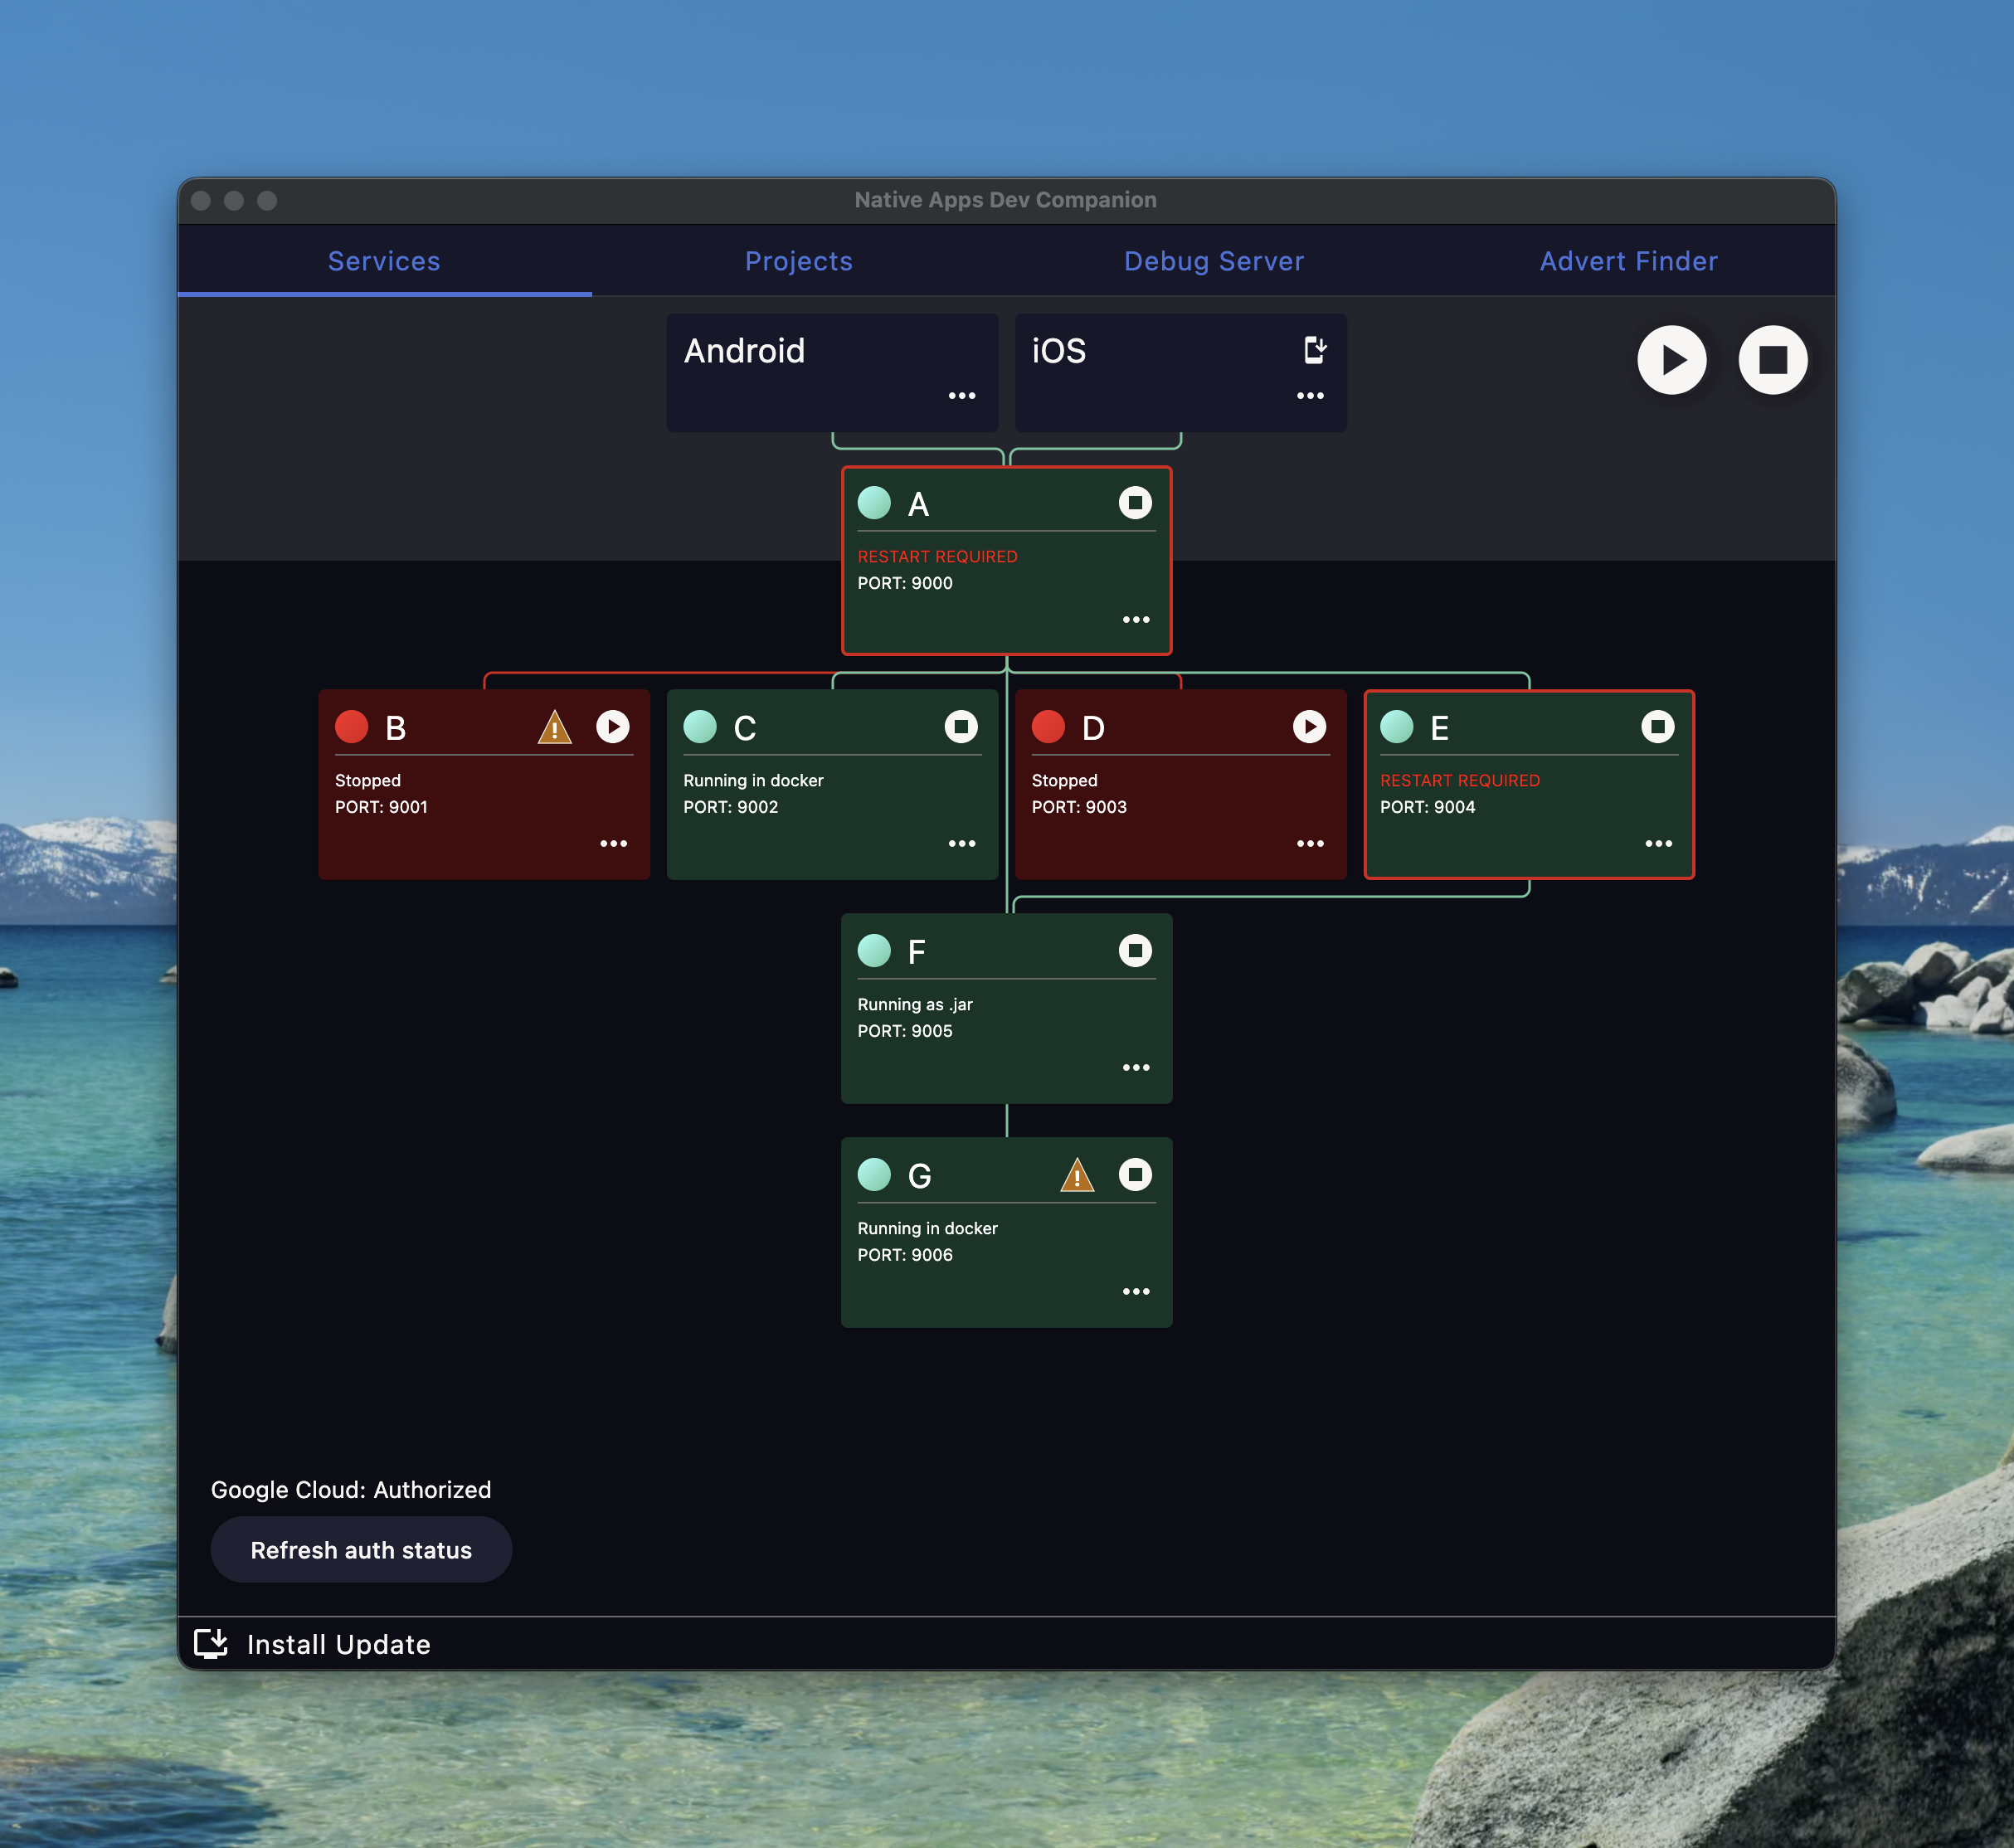
After some fun learning and porting all the process management over I ended up with something like this
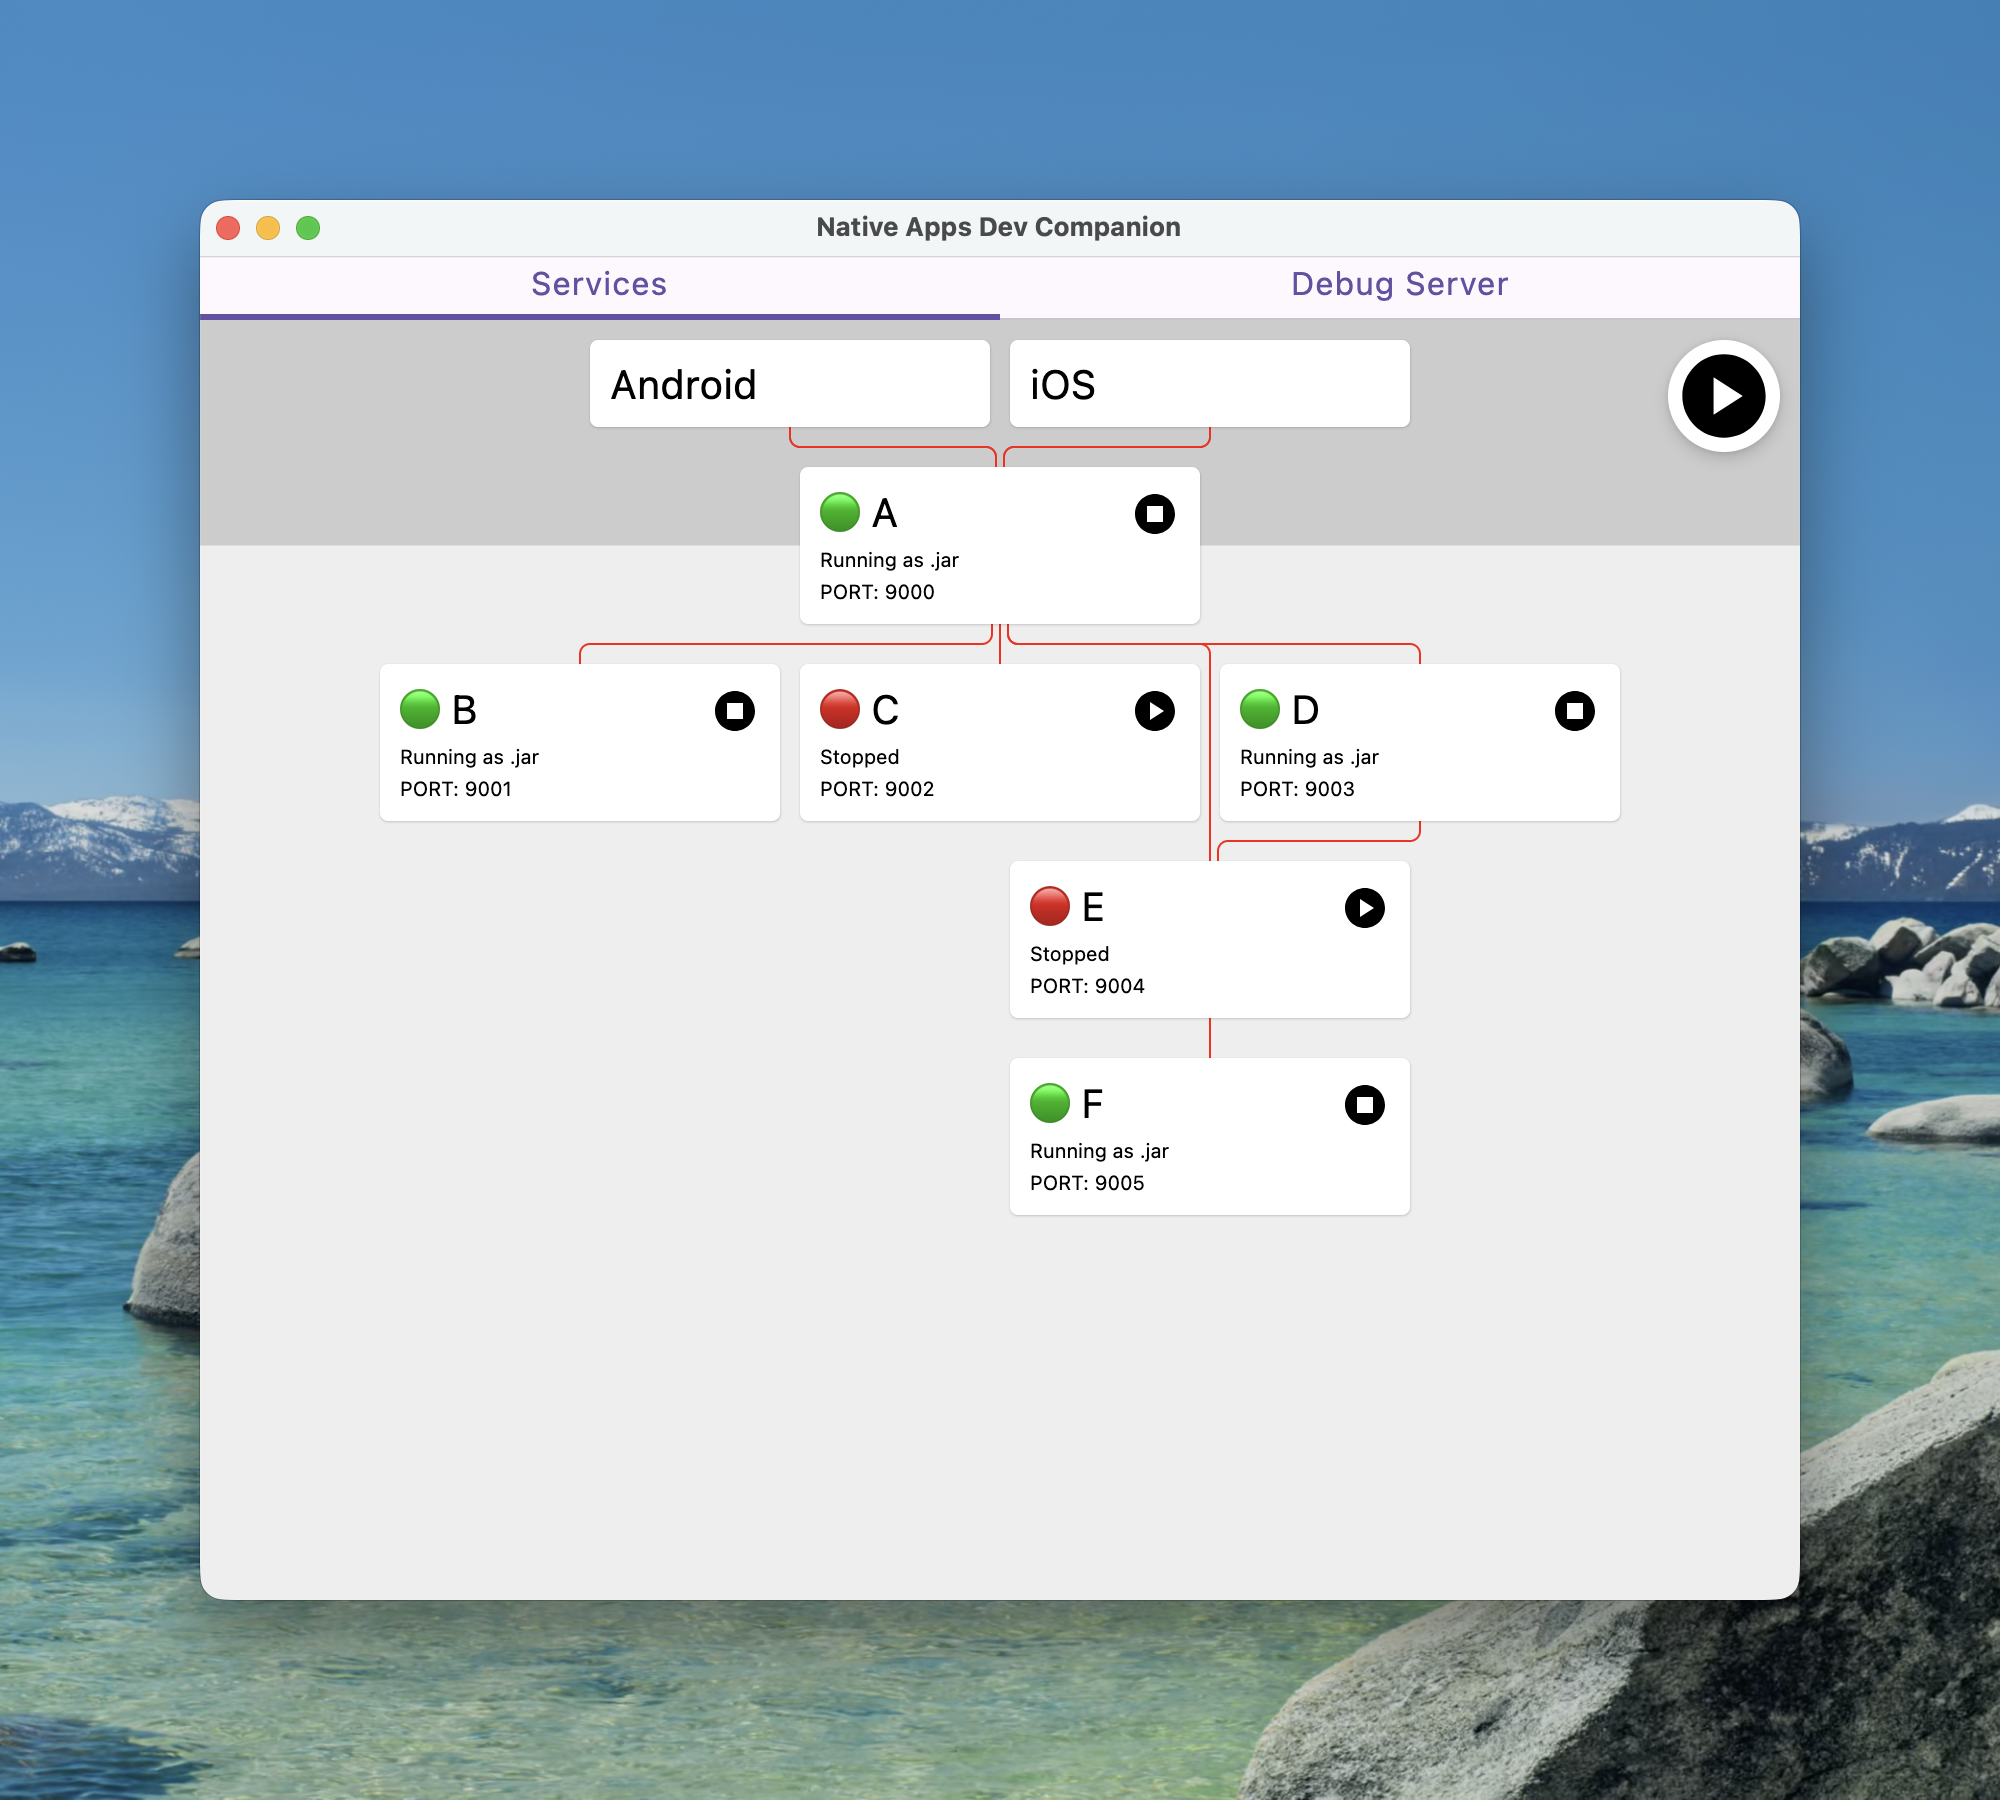
Personally I think I nailed the visualisation requirement as you can now at a glance see what services you’d need running to access different parts of the estate.
The red connecting lines do actually go black to show that the apps can access services but I hastily made changes to get the anonymised screenshot and messed that detection up.
The other main thing with this tool was the autoupdate ability.
I leant on having more contributors and got a colleague to write the autoupdate process logic and it works great.
We even held back giving anyone access to the tool until the autoupdate was available as we just didn’t want to deal with the support.
I was feeling pretty good about this developer experience…
Arrgghh SSO
Then a new requirement came in in the form of services needing to get tokens to communicate to our preprod environment.
Actually this wasn’t a new thing as I’d just been avoiding doing anything about it for a few years but it was being more broadly rolled out so I couldn’t ignore it anymore.
As with most things I put off, the programming part didn’t actually end up being super complicated.
Essentially when a service requires an auth token we need to invoke an external helper tool that does all the SSO magic and then inject the returned token into the relevant service when it is started.
The more complicated part was figuring out how the UI would educate users that they might need to get permission to do this for each service and then signpost how/where they do that.
Once a user is setup they just press the play button like normal and everything is automatic.
If the user isn’t configured then they get an ⚠️ on the service, which tells them how to resolve the misconfiguration.
Make sure you are listening
Another lesson that I completely missed was tuning into the frequency of support requests.
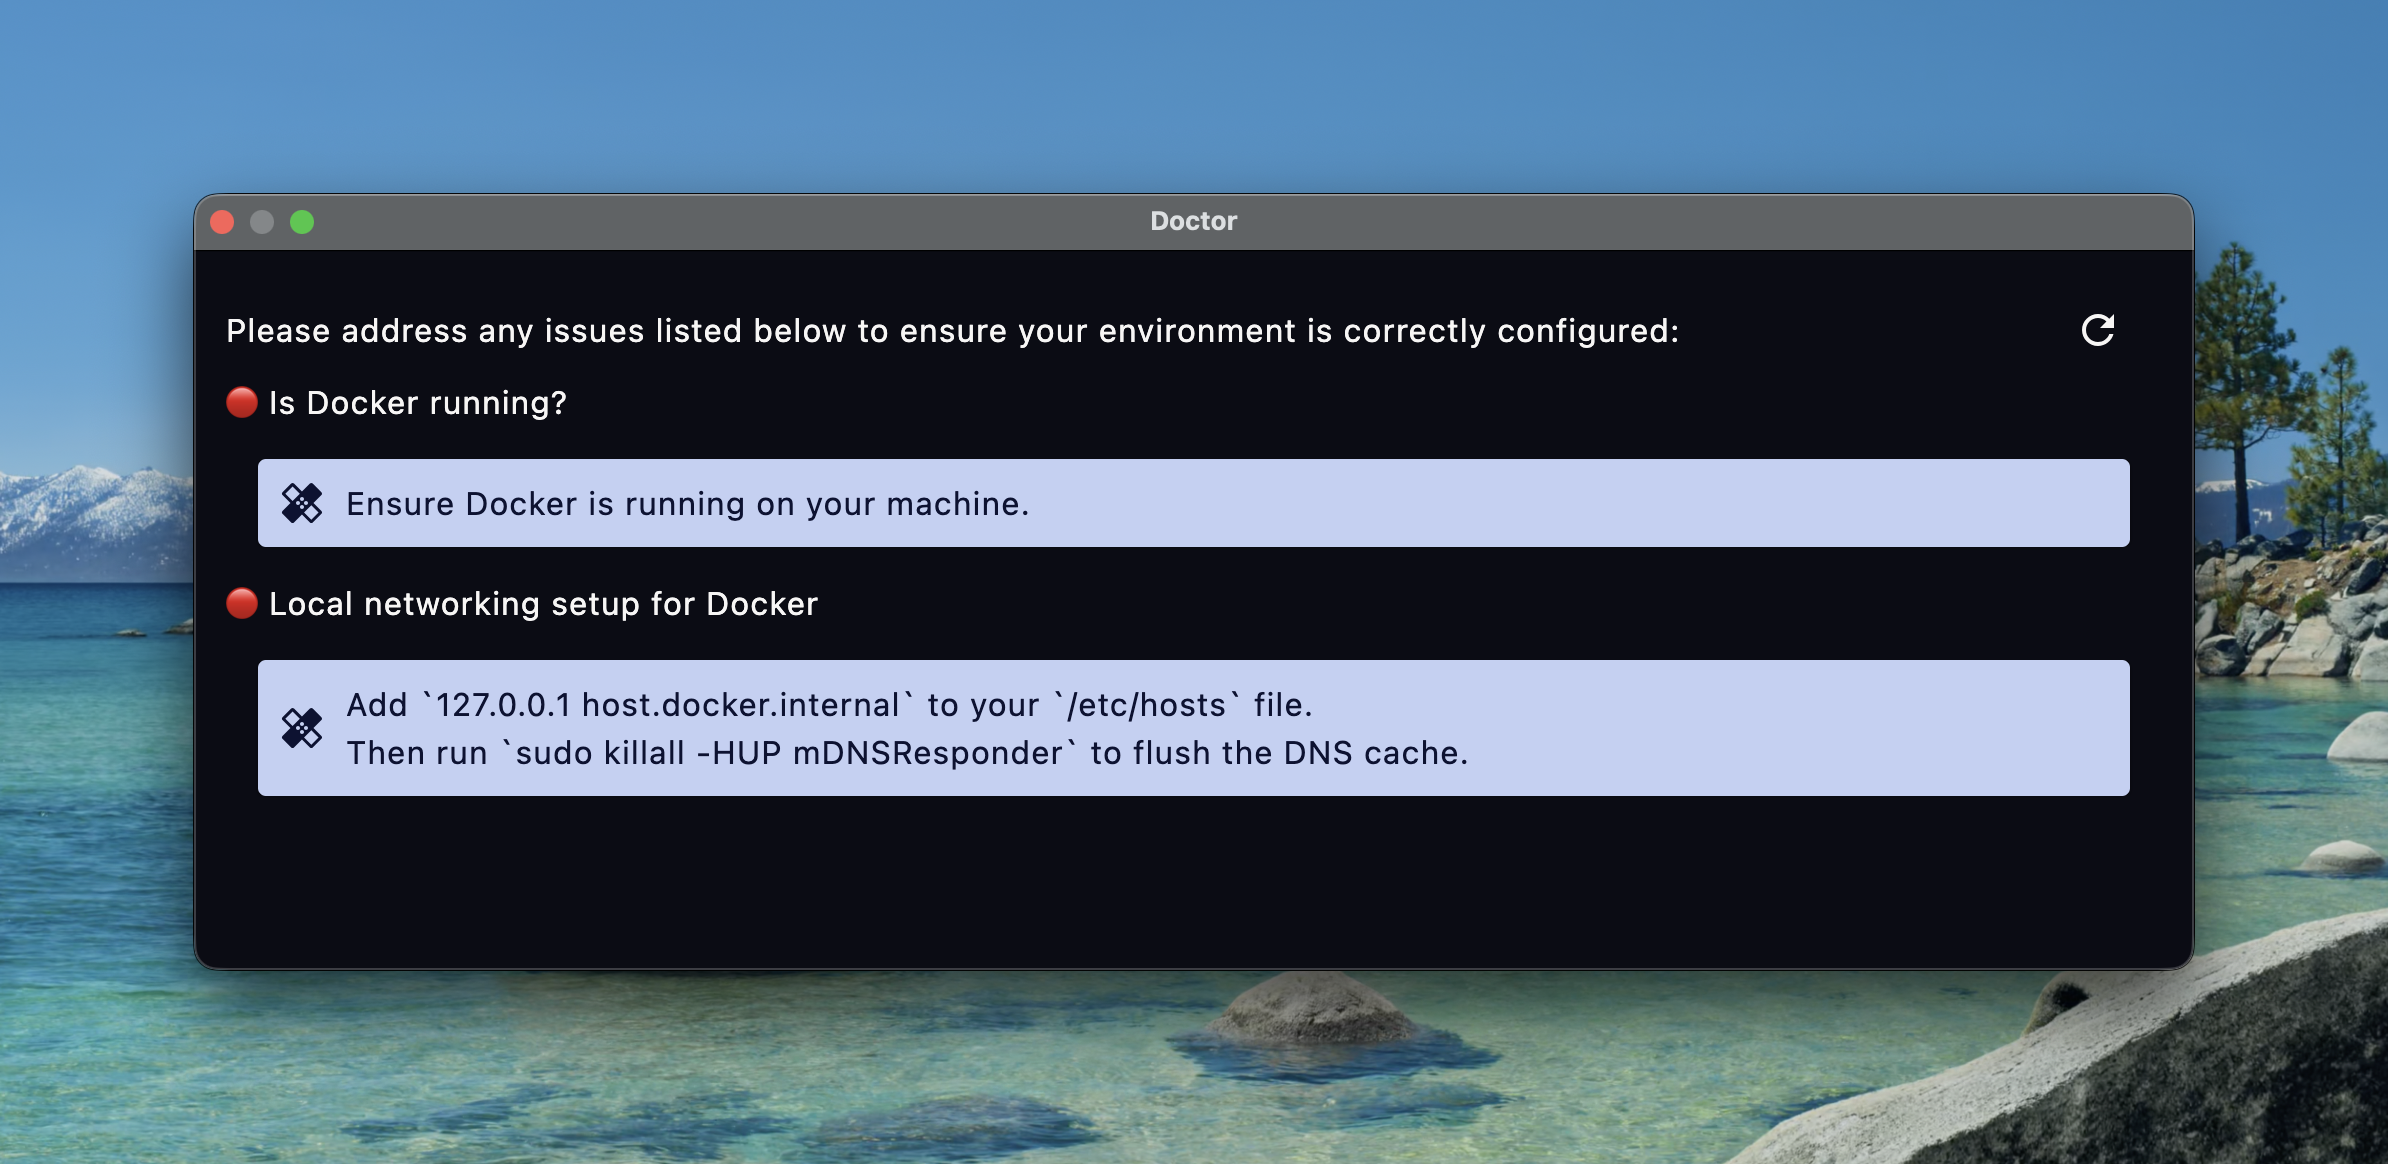
Behind the scenes to get all of the networking setup correctly to allow docker to communicate with localhost seamlessly people need to add an entry to /etc/hosts.
This was constantly missed but quickly resolved with a trip to the docs.
Unfortunately no one knew where the docs were so I’d just be dishing out the link constantly.
Instead of redirecting people to the docs and then helping them through the steps I decided to add a “Doctor” command that will diagnose common misconfigurations/issues and give remediation steps.
Build it Remove friction and they will come
I think there’s a few good victory stories on getting more contributors.
Some that come to mind are:
A massive eye saver from one of the iOS devs was adding dark mode.
A pretty impressive feat considering he’d never done Compose and actually didn’t just tweak colours he went full hog and made various components much more pleasing on the eyes.
Another capability added by a few iOS devs was the ability to install the latest development build into your simulator and launch it.
This is a massive productivity boost especially for web developers who now don’t need to learn how to get the project running and interact with Xcode.
There is still a requirement to have Xcode installed but after that it’s zero knowledge.
One of the QA engineers added hot reloading to make the development experience on the tool that improves developer experience better.
Another observation that we made was that we now have a platform to build out tools that are automatically updating and installed by many people.
This has lead to me sitting with another QA engineer to help them port their command line tool for finding all kinds of difficult to find adverts that people need for testing/development.
I think in total we spent about an hour getting something working together and then he’s been a one man feature factory improving things.
Wrap up
I really think developer experience is important.
Making and evolving tools is a nice way to show your colleagues that you value their time and hear their frustrations.
It’s also been highly rewarding seeing other people get involved and seeing people interested in building a DX culture.
I have no metrics on how much time this tool has saved others but I personally use it multiple times a day and the time I’ve saved alone has more than paid off for the personal investment I’ve put into this.