Most of us are familiar with YAGNI (“You Aren’t Gonna Need It”), that old developer mantra reminding us not to add code or functionality until it’s truly needed.
But if we have a mantra for not adding unnecessary code, it seems only fitting we have one for removing code that’s outlived its usefulness.
That’s where my internal monologue often kicks in: DYSNI - Do Ya Still Need It?
Ruthless Simplification with DYSNI
At the day job, my colleagues Adam and Ellen (aka the only two who foolishly raised their hands when I asked for volunteers to help remove some Objective-C) and I were doing some Objective-C cleanup.
We still have a portion of Objective-C in our codebase, but we’re aiming to remove it.
The team’s Objective-C skills aren’t being exercised and risk atrophying, new hires rarely have experience with it, and its presence complicates adopting modern technologies such as Swift Concurrency.
The first instinct when migrating from Objective-C is usually to just port the code like for like.
There’s often an attempt to make things feel more Swifty, but ultimately the original structure tends to linger.
By asking DYSNI on repeat, we were able to take a pretty gnarly abstraction and simplify it right down.
The Problem
The starting point we had was this lovely structure
The signature of the completion handler was void (^)(NSDictionary *userInfo, BOOL success, NSError *error) (don’t we all just miss the Objective-C syntax?).
The way this was being used is that there was a view controller that held a reference to the current command
The currently executing block would be stored in this ivar until it completed its work and then it was nil‘d out.
The first DYSNI
We started in possibly the worst place but hey that’s how reality is sometimes.
We asked Do Ya Still Need It whilst looking at this hierarchy.
The thinking was that if you have a class with a single method, it could be represented as a single anonymous function.
So instead of holding onto the CommandBlock instance itself we could just hold on to the function reference execute(completion:) with a view to removing the base class at some point.
Why was this a bad starting point?
Because we had to remember Objective-C block syntax… on the second attempt, we got it working and made the following change
Just as we were about to update everything, we paused and asked DYSNI again…
The second DYSNI
Before updating all the code, we wondered if we should check all the callers to see what userInfo is even being used for.
Upon tracing things through for a bit we found that precisely zero callers were using userInfo, so we made the change
That worked well and we kind of assumed that success and error would be used.
Thankfully that assumption didn’t stop us asking DYSNI.
The third DYSNI
We questioned who’s using error so we did the same dance but this time we found one caller was actually reading the error.
Out of curiosity, we followed that caller through and found they didn’t actually do anything with error so
We had to ask is anyone using success or do callers just want to understand when the operation has finished?
In this case success is required so we couldn’t delete it 😢 but never fear because we made things much simpler already.
Thanks to those small DYSNI checks, no future readers of the code would need to ask the same questions we just have.
The fifth DYSNI
At this point we’d spent a fair bit of time in the weeds looking at this function so we zoomed out a bit and asked are these commands even required at all?
What we found was that at some point all uses of CommandA had been removed from the codebase but this was never tidied up.
This unlocked many more opportunities to simplify, for starters we got our delete on and went from
With this simplification done we went back and asked the question we didn’t want to ask but knew we should, do we still need the function signature we spent ages messing around with?
The answer was no we do not - it turns out that we don’t know why there was an instance variable in the first place.
Our best guess is that the original developers assumed they needed to keep a reference to the command whilst it was executing and then nil it out on completion.
In reality, the command is a one shot deal that keeps itself alive until the work is completed then it would naturally go out of scope.
Instead we just new up an instance of the command and invoke it
[CommandB.newexecuteWithCompletion:^(BOOLsuccess){// do some stuff}];
*Controversial use of dot syntax on the new there 👀.
Conclusion
Asking the question “Do Ya Still Need It?” can be a surprisingly powerful tool.
The story above resulted in a diff of 126 insertions(+), 928 deletions(-), which is a great result.
Not only did we reduce line count, but we also encoded our new understanding of the problem into more modern approaches, which will hopefully be easier for future readers to pick up.
Sometimes, when I ask DYSNI, I get the sense people think I’m being lazy or annoying on pull requests but ruthlessly simplifying things down means less work now and less complexity to unpick later.
I don’t use a rebase flow on every project, but when I do, here are the habits that help keep things smooth.
The Basic Command
I use this formulation of the git rebase command
             (1) The commit where we branched from
              |
              |           (2) The branch we want to rebase on top of
              |            |
              |            |              (3) The flag to keep merge bubbles
              |            |               |
           .------. .-------------. .-------------.
git rebase old_base --onto new_base --rebase-merges
By providing the old_base explicitly we avoid scenarios where git gets confused1.
The branch we want to replay all of our commits on top of.
This keeps the empty commits that create merge bubbles.
Keeping merge bubbles is seemingly another contentious topic but I find them valuable.
For example with this listing using git lol2 I can see that feature1 was potentially less complicated than feature2 because it required less commits.
*   cb08e97c1a Merge pull request #2 from feature2
|\
| * a5c310e392 Implement feature2
| * e07178d052 Refactor to make feature possible
|/
*   3fe7557433 Merge pull request #1 from feature1
|\
| * 07b845a110 Implement feature1
|/
*
* The branch names/commit messages in these examples are not good examples of naming/describing but I’ve kept them short to keep the example small.
This view also allows me to know what commits would need reverting if I want to back out a feature.
Verifying the Result
Clean Rebase
If the rebase was clean and there were no conflicts that I had to resolve, I tend to verify that the result is good by diffing between my local branch and the remote.
For this I have another alias git dfr3 (short for diff remote).
A successful result would essentially just contain a diff showing the changes that went into the base branch after the point the current branch was forked.
This breaks down when rebasing a branch that has gotten quite out of date with the new base.
Keep in mind that the diff includes all the changes that went into the new base branch.
This can produce a lot of output, and if you weren’t the one who made those changes, it can be tricky to reason about.
Rebase that had merge conflicts
When I’ve had to resolve merge conflicts during the rebase the above diff isn’t very helpful because the changes dealing with the merge conflicts are mixed in with the changes that went into the new base branch.
To get a better view of things I reach for git range-diff old_base..old_head new_base..new_head.
What this command does is it tries to find the same commit in both ranges using heuristics like commit message.
It then creates a diff between each pair of commits.
The output of this command is a little hard to read because there are potentially two levels of ± indicators in the gutter.
Persevere and it will make sense especially if you have coloured output in your terminal.
Fixing when it goes wrong
Using the verification steps above, I sometimes discover that I’ve messed up a merge conflict.
I’d rather try and fix the broken commit itself over adding a new commit.
To achieve this I reach for an interactive rebase following these steps:
Find the SHA of the parent for the broken commit
Run git rebase --interactive parent_sha --rebase-merges
In the text editor find the sha I want to edit and change its option to e/edit
Follow the usual process of a rebase to step through the reapplication of commits
If you’ve ever used git rebase -i before you’ll notice that adding the --rebase-merges flag really steps up the difficulty level.
For simple edits it’s easy enough to just ignore the commands like label, reset, merge etc and concentrate on the normal options you may be used to.
Starting again
Sometimes stuff really goes wrong and it’s time to admit defeat (for now) and call git rebase --abort.
Even after years of rebasing, I still end up here a lot. It’s not a sign of failure - usually it just means the first attempt went wrong and I’ve learned what to do differently next time.
Pushing changes
I always use the --force-with-lease flag when pushing changes as it’s slightly safer than plain --force.
Essentially --force-with-lease bails out if git notices that your copy of the remote is not up to date.
This reduces the chances of you clobbering someone else’s work because you’d need to do a git fetch to get the latest changes and then resolve any conflicts locally.
Preventing pain
To reduce painful rebases it’s good practice to rebase early and often.
The longer you leave branches to diverge the more chances you have of getting conflicts so integrating as early as possible is beneficial.
Conclusion
The tips and tricks above have taken years to figure out.
As well as knowing the commands I think practicing and trial/error are really the only way you get better at this stuff so don’t be afraid to get stuck in.
When doing a rebase flow if you get a bit behind you can find yourself needing to rebase branches on top of bases that have themselves been rebased.
In this case git tends to pick the wrong base because it has to find the first commit in common.
This can result in duplicate commits ending up in the output and potentially more merge conflicts to handle. ↩
The alias is configured in ~/.gitconfig in an [alias] section
Great developer experience isn’t always about polished UIs sometimes it’s as simple as surfacing the right problem at the right time.
One small feature I added to our tech estate that always makes me smile when I use it is a horrible global pop up.
Here’s what lead me to build it.
The Problem
I work on a mobile app team that owns parts of the backend estate.
We often need spin up multiple web services locally and point our simulator at them.
We’ve built a GUI that reduces all the complexity of configuring these services down to a few play buttons.
This worked well for years until we started needing to talk to various services using OAuth.
To boot these services we now need to obtain a JWT and inject it into the container.
Obtaining the JWTs is easy as our delivery platform team provide helpful tooling.
Where we hit pain is that developers are used to starting these services and forgetting about them, potentially having them run for days.
This doesn’t work so well now with the JWTs having short expiry times meaning that services start to fail in interesting ways that may not be super obvious to debug.
The Solution
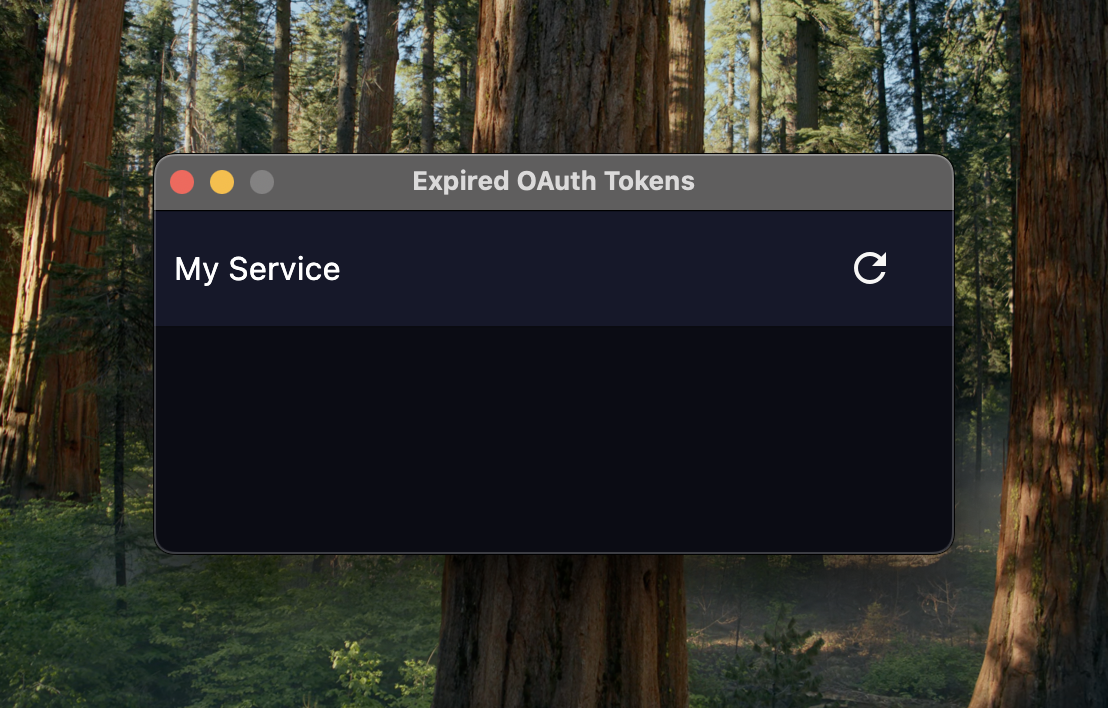
I solved this by adding a global pop up that shows which service’s token has expired and provides a restart button.
I could have automatically restarted services but it feels more user friendly to let developers decide when this is going to happen.
It looks like this:
* The image capture software I used makes this pop up look novelty sized, it’s not this big in reality but it made me chuckle so I’ve left it in.
Design notes on the behaviour of the pop up
It sits on top of all windows
It can be dismissed but comes back if you activate the application again
If more than one service needs restarting it offers a single button to restart them all
How does it work technically?
I’m glad you asked… as the services are all running in docker we can run docker inspect <container-id>, which returns a load of helpful information about the running container.
Nestled away under Config > Env is all the environment variables that were provided to run the docker container.
We can grab the environment variable that contains the JWT and then decode the payload to get access to the expiry information.
Our tooling is built using Kotlin Compose Desktop so these code snippets are for Kotlin.
We start by declaring a @Serializable type that represents the payload and use a handy custom serializer to get the expiresAt value in the right format.
At this point we know when the token expires and we can just schedule for the UI to appear at the right time.
The Result
As a developer I always get a sense of satisfaction when I tap the button and it automagically gets me a new token and restarts my service.
I knew the pain of manually getting a token and then trying to remember the right docker commands to stop the running service, export my fresh new JWT then restart the service so I enjoy seeing the friction removed.
As someone supporting other developers, I love that I can’t remember the last time someone came to me that had been tripped up by expired tokens.
Conclusion
Not everything has to be an engineering master piece it just has to solve a problem.
These OAuth tokens were a real usability issue for developers who are mainly focussed on the front end, where running backend services locally is more of a secondary concern.
The best developer tools don’t just automate they anticipate where developers might trip up and quietly save the day.