This post is an attempt to tie together a lot of related thoughts I’ve had and written about for a long time.
The high level idea is to take our clean well modularised code and reuse it in interesting ways.
I take a networking client written in a reusable way that enables us to build an iOS application, a command line interface (CLI) and a website.
In this post the CLI and website are not for production use - they are for debugging and pro-active monitoring, to support the iOS application.
Overview
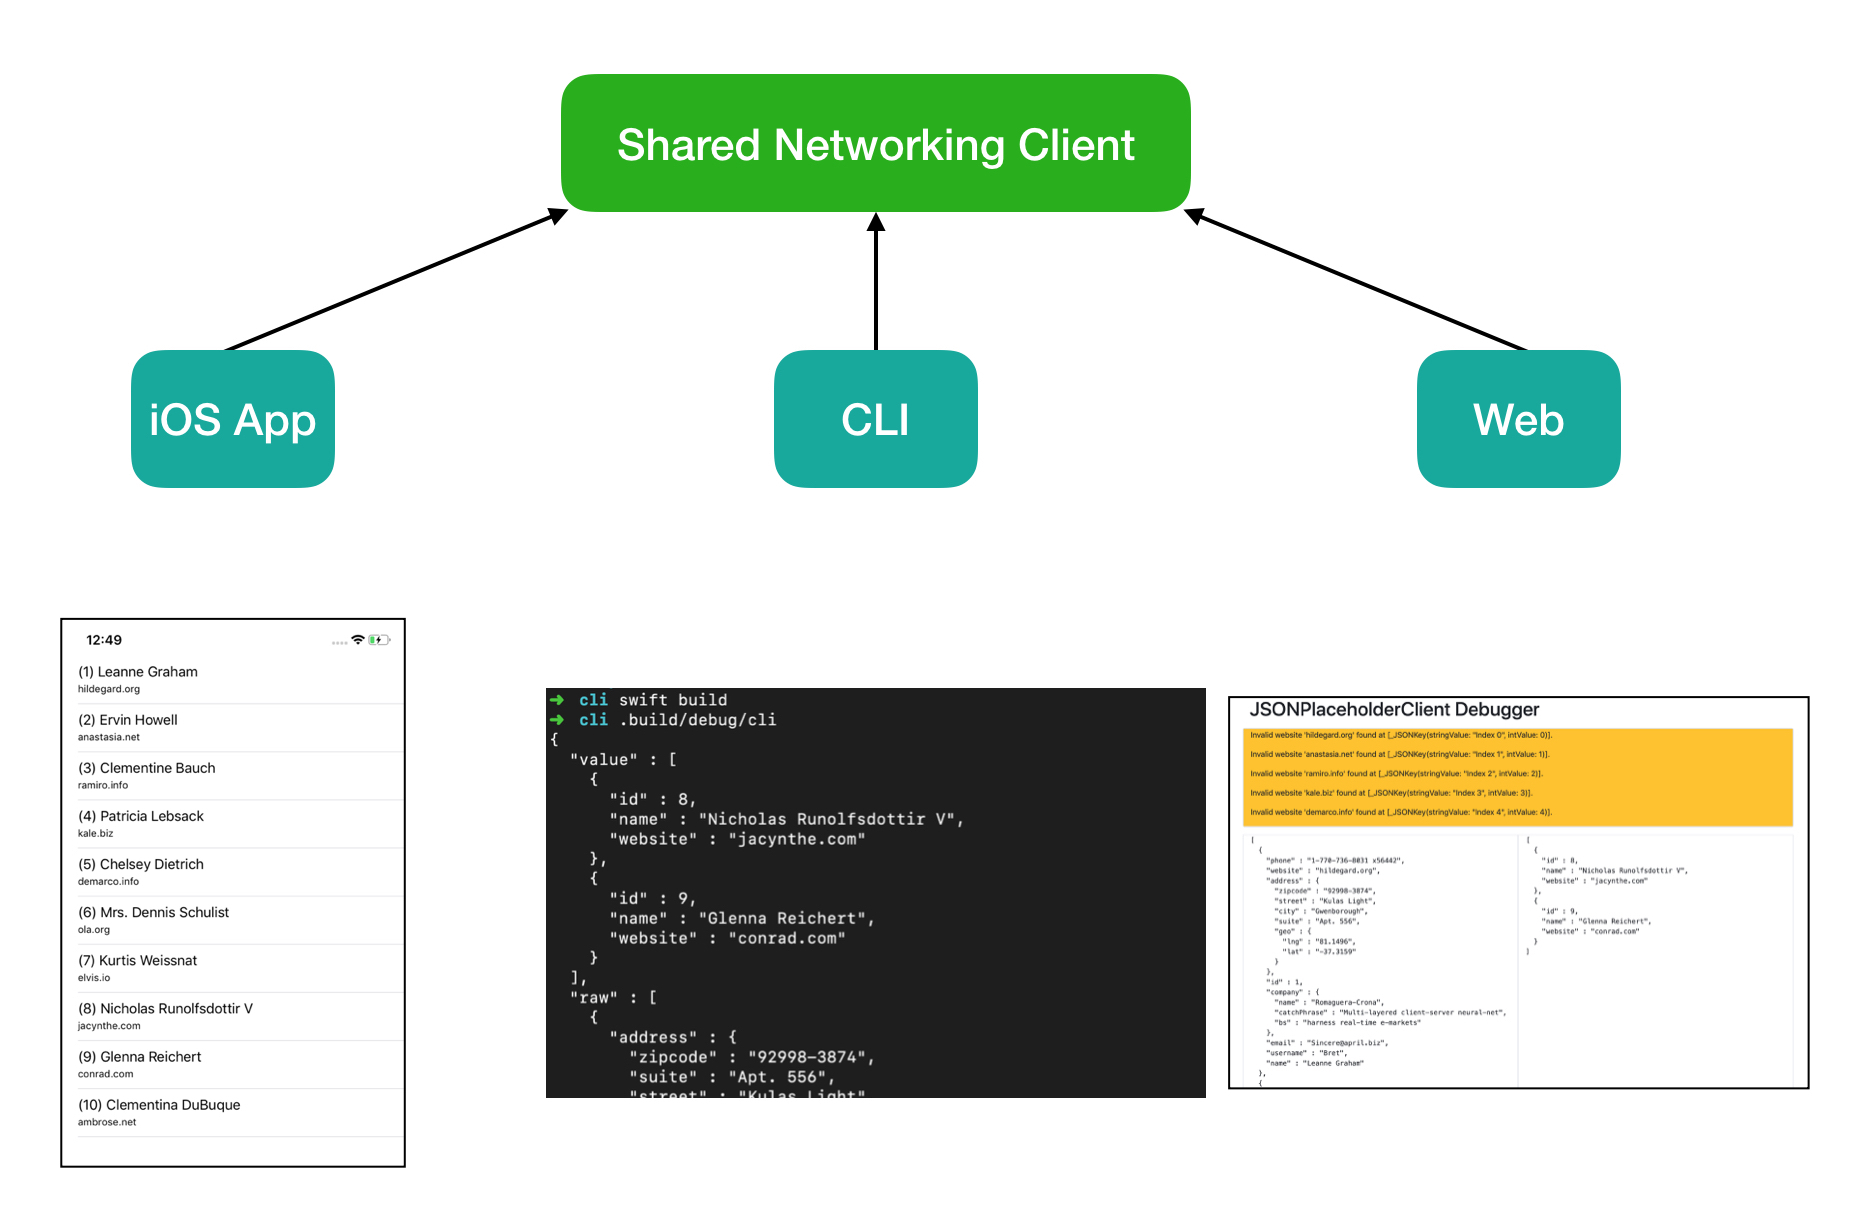
In the linked Github repo I’ve built the following structure.
There is a shared component and then 3 front ends built on top of it.
The high level pattern in each front end is:
Utilise the Networking Client to fetch [Person] instances.
Transform [Person] instances into a representation that is appropriate for each front end
iOS uses a table view
cli uses pretty printed JSON
web uses HTML
Why bother?
Before diving into any code it’s probably worth looking a bit more at why we would want to do this.
Why make a website?
Imagine getting a call out because your app is not displaying all the data it should from the backend.
To debug you might need to do at least these two things:
1) Check the backend data manually 2) Run the app in the debugger to explore the data
The first of these can actually be fairly tricky to do.
You might be a master with curl but not all APIs are easy to inspect; perhaps there is encryption, authentication, specific headers are required or there is a lot of link traversal.
This brings you to the second type of debugging, which can be slow and painful.
Depending on how you have programmed your decoding it may not be easy to figure out why data is being discarded.
This topic is something I touched on in Handling bad input with decodable.
Now imagine if you could instead just navigate to a website that uses your production code and displays all errors.
How much time would that save?
Why make a CLI?
Giving your code a CLI gives you the ability to programmatically interact with it from a lot of different contexts.
Imagine writing a tool that will pro-actively monitor the usage of your code and reports automatically when there are issues.
At this point you can find issues before your customers do.
Pushing further upstream - you could provide your CLI to the team who manages the backend so that they can add it to their CI pipelines.
By adding your production code to their CI pipelines you can be assured that any releases they do will now never break your application.
The above just scratches the surface of what you can do but hopefully it provides enough motivation to read on.
The shared client
In order to keep the examples on Github as simple as possible I’ve put all of the shared code into a single module.
The networking client has the following interface:
The result makes use of an odd looking type called Decoded that I briefly covered at the bottom of Handling bad input with decodable.
As a recap it looks like this:
The reason for this type is that I ideally want my debugging tools to use the production code.
This type allows you provide a single API (the fetch function) that can return just the data you need in production and richer debug data when you ask for it.
I’ve toyed with the idea of just having two functions called fetch that have different completion handlers with the data required but it’s not a generic solution and it’s easy for the two methods to get out of sync.
In order to change whether you get debug or prod data you configure the client when you create it using a factory function:
Line 4 creates my client with debugEnabled: true - this is really important as we want as much data as possible in order to debug issues.
Lines 5-14 are creating a pretty printed JSON string representation of the data, this will be the simplest format for interoperating with other tools.
Imagine piping this to the input of other tools on the command line.
Line 26 is what keeps this app running so that we can perform our asynchronous networking.
Lines 16-23 perform the duty of printing our output and exiting with the correct status code.
That’s it for a basic CLI - this was extremely painless to create but now opens up a lot of possibilities.
We can access the data in the exact same way that out iOS application does using the same networking and serialisation code.
Running this tool looks something like this (this JSON is heavily edited as it’s long):
The interesting thing to note about this JSON is that there are 3 top level keys value, raw and errors.
These correspond to the app’s decoded representation, the raw JSON representation and any decoding errors respectively.
Basic website
In this example I use Vapor - the idea is that I can provide a slightly more human friendly user interface that can be deployed in a docker container.
The website will again leverage the exact same production code used within the iOS application but it will be in debug mode.
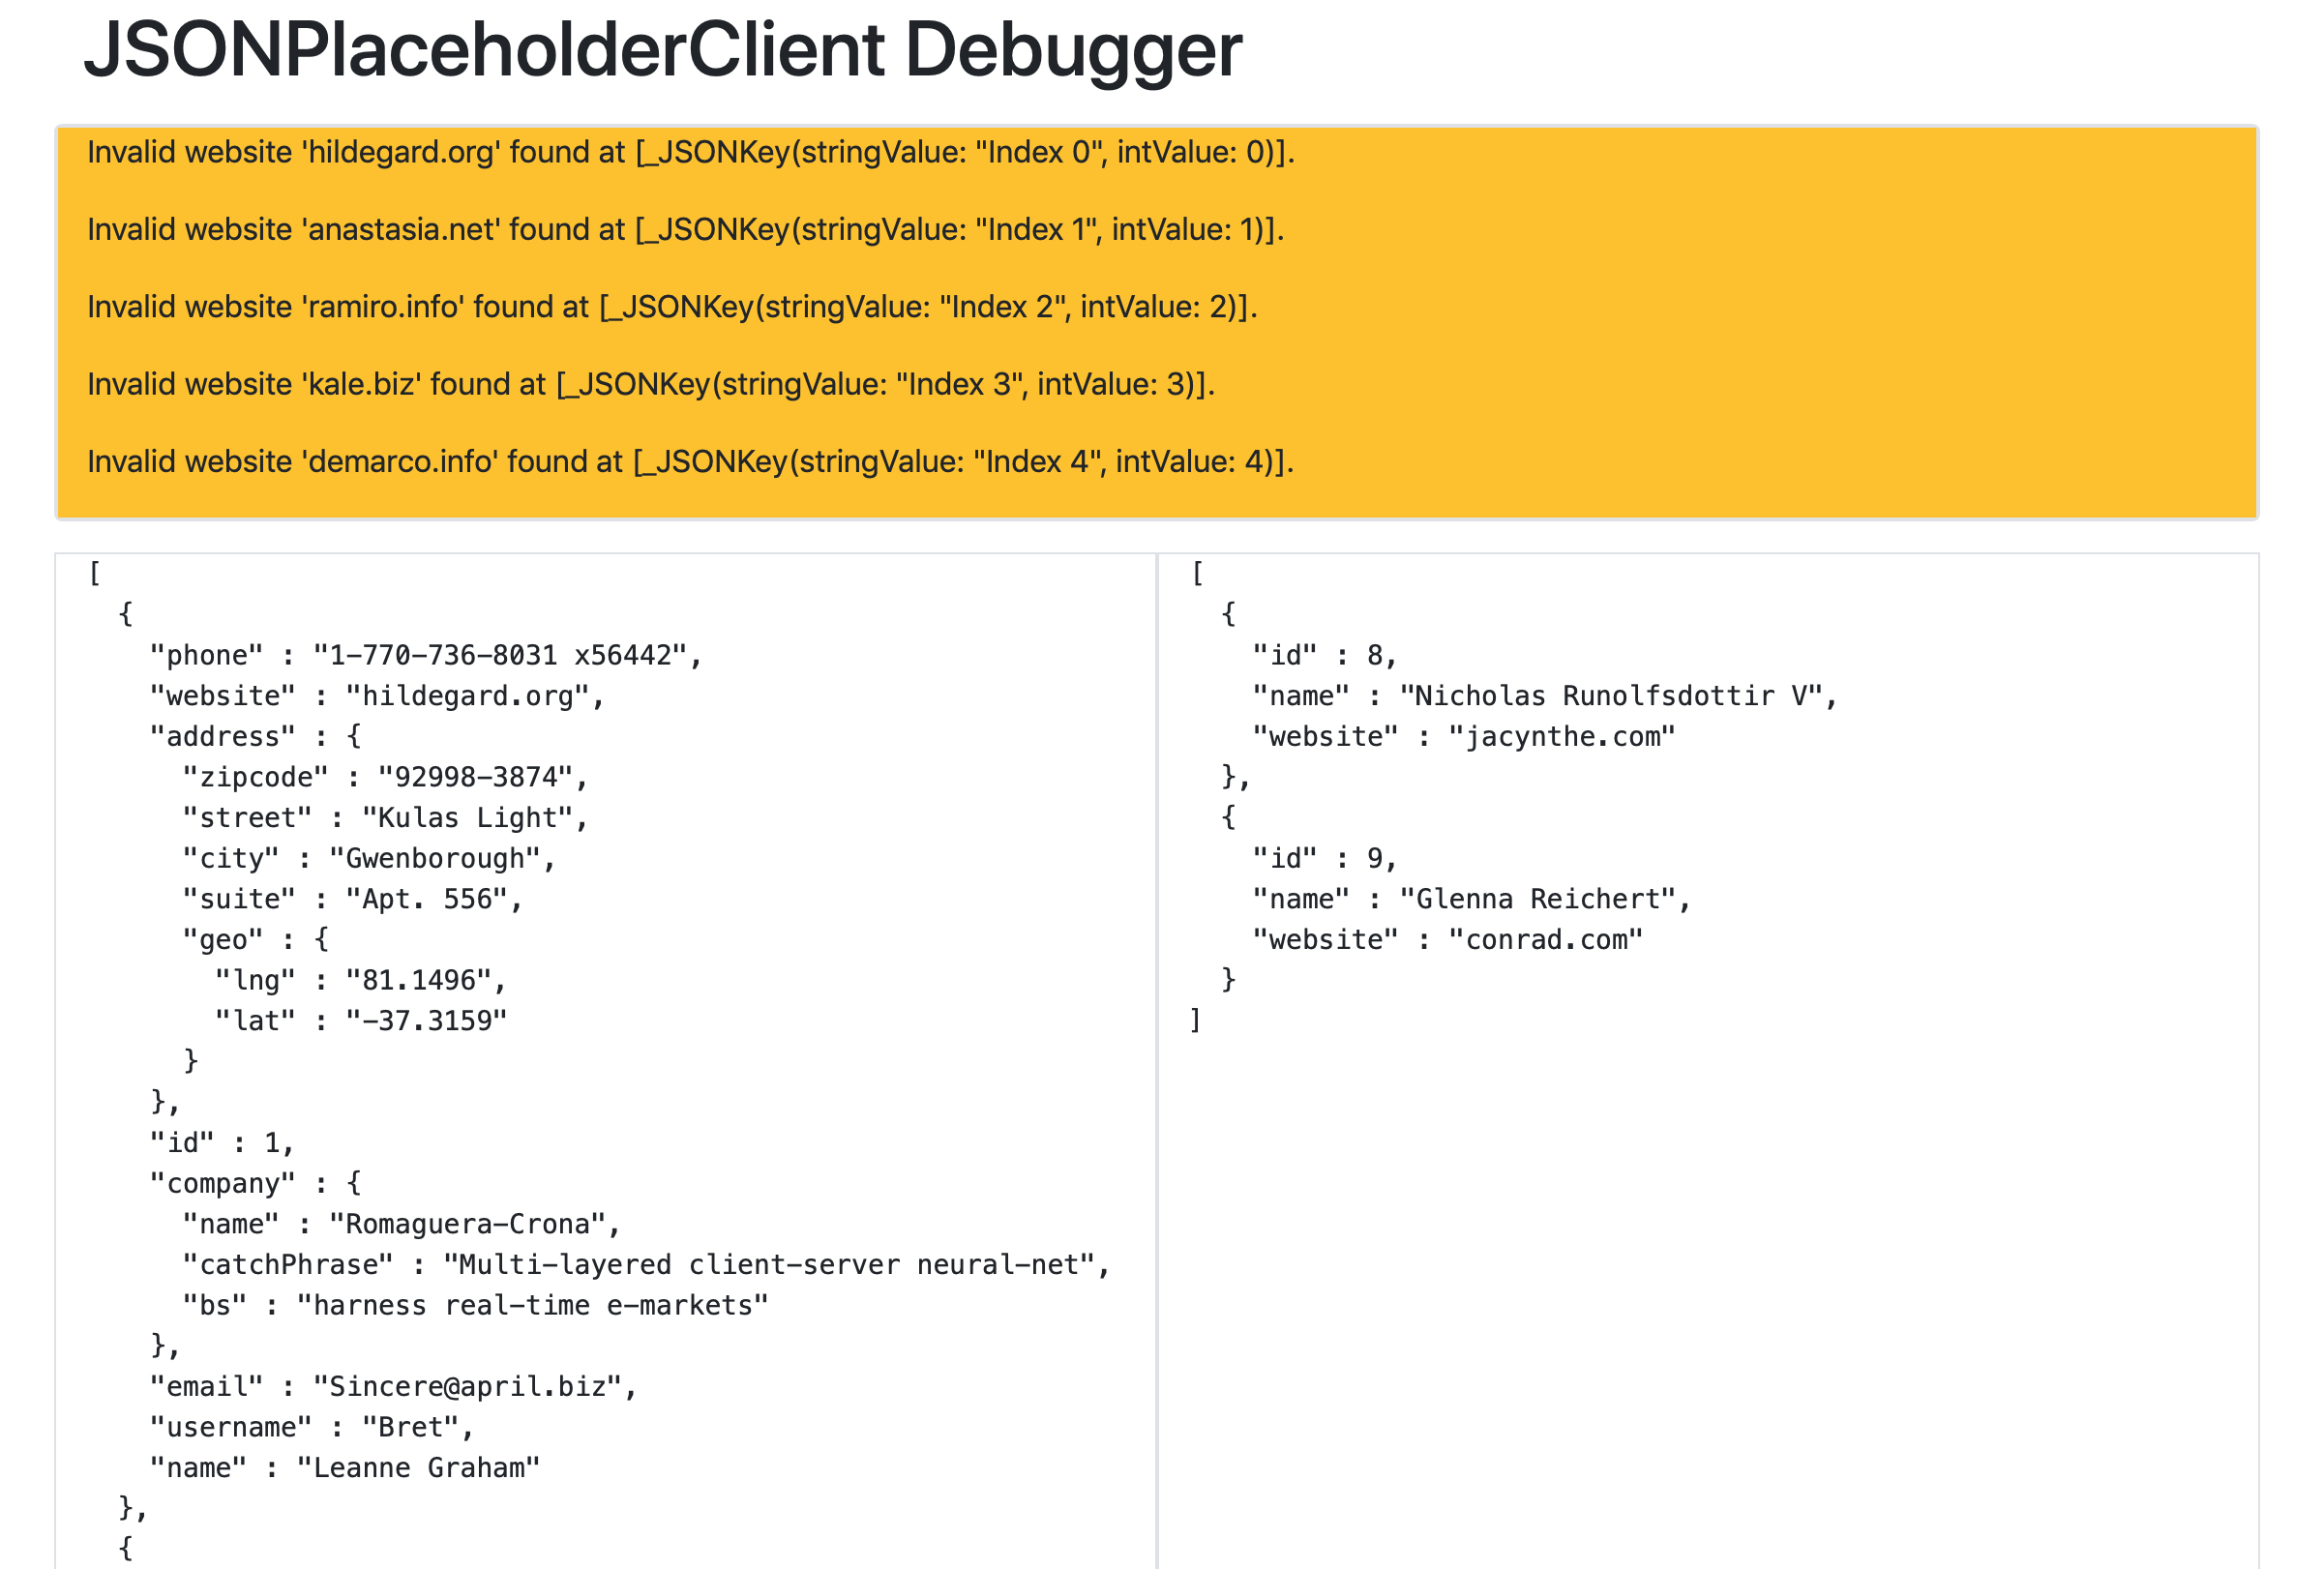
Here’s what the end result looks like:
It’s not pretty but it’s functional.
There are 3 sections:
On the top we have the errors that were output during serialisation
On the left we have the raw input data
On the right we have the decoded data as the app sees it
In the screenshot above we can see that a lot of users are not being parsed due to some website error.
On the left hand side we could now inspect the raw data and compare against the items that were parsed.
This should make debugging much much simpler.
I’m not going to lie the building of the website is more involved than building the CLI.
The principle is the same as the CLI in that we are reusing our client and essentially mapping from the client’s representation of a result to a HTML representation.
To do this I’ve registered a single route that will run a single function called Index.action.
This function actually looks simpler than the CLI but that is purely because I have moved prepare and render out to different files.
Due to the added complexity of rendering for the web I’ve made prepare act like a presenter that is just preparing data to be shown.
Then render is where the prepared data is essentially pushed into the HTML template.
Conclusion
This is one example use case or creating new tools that utilise your code in new and interesting ways.
I’ve put up a Github repo that demonstrates all of the things mentioned, so anyone should be able to clone and play around with the concept to see how it all hangs together.
When consuming data from an external service we can’t always guarantee that the source data will be structured how we expect.
This makes our apps potentially brittle when using Decodable because it is so strict on structure.
In general everything needs to decode successfully to get results back, if any object fails to decode then you get no results at all.
This is not ideal for our end users as we should fail gracefully by showing the content that our app can parse and not just show empty data screens.
Problem outline
In the following code we have a data type called Person that has two non optional properties.
We also have some input data in the form of a JSON array that contains two objects.
The first object has both of the required properties whereas the second does not.
When executing the above code we do not get an array with one valid Person instance instead we end up in the catch statement with a keyNotFound error, which is caused by the second object in the JSON array not having both of the required properties.
How do we fix this?
This is actually not as easy as you might think (at least I didn’t think it was).
The first problem to solve is that the default behaviour when decoding a collection is that it will throw if decoding any of the collection’s children throws.
If we decode a collection manually we can avoid this behaviour but then we encounter the issue that the decoder’s currentIndex will only progress forwards when a decode of a child object is successful.
This basically means that when trying to decode the collection’s children if any of the decodes fail we won’t be able to continue iterating through the collection.
There are a few strategies that we could take:
1) Loosen the strictness of our type
This seems like a terrible idea to me.
Our types should model our domain accurately e.g. if our app can’t handle a property not being present then we shouldn’t model it as an optional.
I try to get rid of optionality as soon as possible or you find that you get optional handling code leaking throughout your entire codebase.
2) Create a private type that is less strict
This is an improvement on the above because we are restricting the scope of the more permissive type.
Internally we might parse a private _Person type that has the optionality and then optionally convert this back to our Person type.
3) Create a wrapper to swallow any exceptions during parsing
This is fairly similar to option 2 in that we are creating a wrapper but it’s more generic as we won’t need to manually hand roll these private types.
Option 2
I’m not bothering with option 1 as it’s a weak option so I’m jumping straight to option 2.
Let’s start by creating the more permissive variant of Person where the properties are now optional:
When using the [_Person].self type the decoding will no longer throw with our input data.
Next we need to convert _Person instances into our stronger Person type - we’ll add a new init to do the optional conversion:
It’s not particularly pretty but it’s now gracefully parsing as much of the input data as possible and discarding the bits that are not usable.
Option 3
This option comes from this answer on stackoverflow.
The high level idea is to wrap the type we want to decode with something that will successfully decode regardless of whether the wrapped type succeeds or not.
I think Option 3 is the stronger option here because it requires less code and less duplication of types.
How do we debug?
We’ve made our app more resilient to bad input but we’ve introduced an issue.
How on earth do we debug this now when stuff goes wrong?
In general if the backend feed is providing 10 objects then our app should be able to parse and handle all 10 of those objects.
If the app is silently discarding data then this could be seen as good and bad
Good because the user is seeing some data.
Bad because the app is silently throwing data away and not telling anyone.
The silencing of errors is occurring due to the try? being used in FailableDecodable.
What we need to do is capture the errors rather than just discarding them.
Again this is another case where it’s not immediately obvious how we can resolve the problem.
This is still thinking in progress but here’s one potential way:
Add some context to our Decoder for capturing errors
Teach FailableDecodable how to use the new context.
Make both of the above optional so we don’t waste resource storing/processing data that we don’t need.
Let’s start by adding context to our Decoder.
A Decoder has a userInfo property that seems like it will be ideal.
We’ll add a class at a known key that can hold our errors collection (it needs to be a class so that the errors collection can be mutated).
The following code performs the above but in a slightly more involved way to remove the stringly typed aspect of storing things in a Dictionary:
Now that we have this scaffolding in place we need to teach FailableDecodable how to use this stuff.
This is essentially removing the try? and expanding it into a full try/catch and using the error:
Pulling all of this together we can now parse our code in a fail safe way and get both the results and errors (when we want them).
To get the errors we need to configure the decoder before using it like this:
In this post we’ve looked at some motivations for wanting to parse data in a more permissive way and how you can achieve it using Decodable.
Some of these things are not very obvious but once you get your head around how it works you can start to see further ways to improve debugging.
Bonus debugging fun
Getting both the results and any errors that were generated whilst creating the results is great but wouldn’t it be even better if we could also capture the raw data.
This sounds a little daft because we should have access to the raw data if we are decoding it - this is true but in my experience I see people tend to chuck raw data into a decode call and leave it at that.
By doing this we are losing the potential context of the raw data because we don’t parse/log it anywhere.
We can fix this problem by creating a new generic type that will decode what we want but also optionally grab the raw data as well. This example makes use of AnyCodable from Flight School.
Testing is fairly common practice but there are plenty of rough edges that catch people out. One area that causes trouble is testing across module boundaries. In this post I’m going to walk through the evolution of an API and explain how to approach testing at each step, which often requires evolving the API slightly.
Understanding how to test different scenarios is important because it empowers us to craft the boundaries we want without having to compromise on testing or aesthetics.
There are a few key approaches that I’m going to cover:
The relationship between these types is PersonRepository --> TransientStore, which is to say that the PersonRepository has a strong dependency on TransientStore and knows the type by name.
What do we want to test?
Before we dive into analysing the current structure I think it’s important to highlight exactly what I feel is important to test here for this blog post.
From within my main application I want to test the collaboration between PersonRepository and TransientStore - this is the collaboration across the module boundary. In more concrete terms I want to be able to write tests like:
If I call PersonRepository.fetch(id:) it should:
Invoke TransientStore.get(key:) with the id value that was passed to the original function
If data is returned it should attempt to JSON decode it
If I call PersonRepository.store(id:person:) it should:
Attempt to JSON encode the person passed to the original function
Invoke TransientStore.set(key:value:) with the id from the original function and the encoded person
The above are the high level collaborations, in reality there would be many permutations of these tests to validate what happens for the unhappy paths like invalid input etc.
What I am not interested in for the sake of this blog is testing the behaviour of TransientStore. In a real project I would expect that TransientStore is well tested to ensure that it honours the public contract that it provides.
Subclass and Substitute
With this first iteration I can test this collaboration by subclassing TransientStore and overriding it’s various functions to create a test double. Here’s an implementation of this test double:
To show how this would be used - here’s the two test cases I mentioned above:
finalclassPersonRepositoryTests:XCTestCase{vartransientStoreMock:TransientStoreMock!varsut:PersonRepository!overridefuncsetUp(){super.setUp()transientStoreMock=TransientStoreMock()sut=PersonRepository(cache:transientStoreMock)}overridefunctearDown(){transientStoreMock=nilsut=nilsuper.tearDown()}functestFetch_collaboratesWithTransientStore(){letexpectedID="12345"transientStoreMock.onFetchCalled={XCTAssertEqual(expectedID,$0)returnself.encodedPerson}XCTAssertEqual(.fake(),sut.fetch(id:expectedID))}functestStore_collaboratesWithTransientStore(){letexpectedID="12345"varwasCalled=falsetransientStoreMock.onStoreCalled={XCTAssertEqual(expectedID,$0)XCTAssertEqual(self.encodedPerson,$1)wasCalled=true}sut.store(id:expectedID,person:.fake())XCTAssertTrue(wasCalled)}varencodedPerson:Data{// Happy to use a force cast here because if this fails there is something really wrong.returntry!JSONEncoder().encode(Person.fake())}}extensionPerson{staticfuncfake(name:String="Elliot")->Person{return.init(name:name)}}
This works but there are a few things I’m not keen on:
To actually make this work I need to update TransientStore to be open so that it can be subclassed externally. This is not a great change to be making just to enable tests. The mere addition of the open access control modifier may suggest to an API user that this type is intended to be subclassed.
This only works for class types so we need a different solution for struct and enum.
There is a burden on me as a test writer to know what to override in our TransientStore subclass. If I don’t override the right stuff then my tests will not be isolated and could be causing all kinds of side effects.
Before moving on… if the above technique fits your needs and you don’t share my concerns then by all means use it - there really is no right and wrong if stuff works for your requirements.
Use an Interface
We can resolve all 3 of the issues above by making PersonRepository depend on an interface that we’ll call Store and then make TransientStore depend on the same interface.
This has the effect of inverting the direction of the dependency. Doing this would give us the following (notice how the arrows all point away from the concrete details):
PersonRepository --> Store (protocol) <-- TransientStore
Let’t take a look at the changes required to get this working. We’ll update the Storage module first:
+ public protocol Store {
+     func get(key: String) -> Data?
+     func set(key: String, value: Data?)
+ }

- public class TransientStore {
+ public class TransientStore: Store {
      public init()
      public func get(key: String) -> Data?
      public func set(key: String, value: Data?)
  }
Above I’ve added Store as a protocol. TransientStore is almost identical to our first implementation except we are able to remove the open modifier and we conform to Store.
With this change in place we can update the PersonRepository to the following:
  final class PersonRepository {
-     let cache: TransientStore
+     let cache: Store

-     init(cache: TransientStore = .init()) {
+     init(cache: Store = TransientStore()) {
          self.cache = cache
      }

      func fetch(id: String) -> Person? {
          return cache.get(key: id).flatMap { try? JSONDecoder().decode(Person.self, from: $0) }
      }

      func store(id: String, person: Person) {
          cache.set(key: id, value: try? JSONEncoder().encode(person))
      }
  }
The only difference here is that all references to TransientStore have been replaced with Store except for the default argument instantiation in the initialiser.
With this the body of the tests can remain identical but we need to update the test double to conform to a protocol rather than subclassing:
- class TransientStoreMock: TransientStore {
+ class StoreMock: Store {
      var onFetchCalled: (String) -> Data? = { _ in nil }
      var onStoreCalled: (String, Data?) -> Void = { _, _ in }

      func get(key: String) -> Data? {
          return onFetchCalled(key)
      }

      func set(key: String, value: Data?) {
          onStoreCalled(key, value)
      }
  }
As promised this resolves all 3 issues mentioned above and it didn’t really require many changes. The first two are resolved because we have removed the inheritance aspect. The third issue is resolved because if we modify the protocol to add a new requirement then our tests will no longer compile.
This gets me to my happy place where I am doing compiler driven development, which means I just fix all the things the compiler complains about.
I do have a gripe with the above solution and it’s that we’ve hidden some details because we are using a protocol but I still had to reference the TransientStore type by name within the PersonRepository, which highlights that TransientStore is still publicly visible. If we look at the public header for our Storage module again we can see that it leaks implementation details:
As a consumer of the module I might assume that it would be sensible to use TransientStore directly as it’s freely provided in the public API.
Hiding Details
We can resolve the above issue by hiding the concrete TransientStore type entirely. The way to do this is to provide a factory function that will create a TransientStore but it won’t externally reference the TransientStore type. We can then set everything on TransientStore to have internal visibility:
+ public func makeTransientStore() -> Store {
+     return TransientStore()
+ }

- public class TransientStore: Store {
-     public init()
-     public func get(key: String) -> Data?
-     public func set(key: String, value: Data?)
- }
+ class TransientStore: Store {
+     init()
+     func get(key: String) -> Data?
+     func set(key: String, value: Data?)
+ }
It may not seem like we did anything there apart from change some visibility but the end result is the public interface for the Storage module is now much simpler:
  public protocol Store {
      public func get(key: String) -> Data?
      public func set(key: String, value: Data?)
  }

+ public func makeTransientStore() -> Store

- public class TransientStore: Store {
-     public init()
-     public func get(key: String) -> Data?
-     public func set(key: String, value: Data?)
- }
As you can see there is no mention of the actual type TransientStore. The function name does include the name but this is just a label it’s not the actual type itself being leaked.
At this point we have a nice seam that allows us to provide alternate Store implementations into our code base, whether that be in tests or in production code.
Type Erasure
Type erasure can be pretty daunting but it’s really useful when you know when it can be utilised. I don’t think I’ll ever get to the point where I use it often enough that I remember how to do it without googling - maybe I’ll end up back on this post in the not too distant future.
Continuing with our example above we might wonder if we can make our API more generic and use any Hashable type as the key.
To achieve this in Swift we need to add an associatedtype to the Store protocol and use the new type where we was previously hardcoding the String type:
  public protocol Store {
+     associatedtype Key: Hashable

-     public func get(key: String) -> Data?
-     public func set(key: String, value: Data?)
+     public func get(key: Key) -> Data?
+     public func set(key: Key, value: Data?)
  }
Updating the TransientStore to conform to this interface requires that we make the class generic:
- class TransientStore: Store {
-     func get(key: String) -> Data?
-     func set(key: String, value: Data?)
- }
+ class TransientStore<Key: Hashable>: Store {
+     func get(key: Key) -> Data?
+     func set(key: Key, value: Data?)
+ }
The changes so far are valid but the compiler starts getting very unhappy with our factory function for creating a TransientStore
publicfuncmakeTransientStore()->Store{//=> Protocol 'Store' can only be used as a generic constraint because it has Self or associated type requirementsreturnTransientStore()//=> Return expression of type 'TransientStore<_>' does not conform to 'Store'}
This isn’t going to work because the associatedtype means that we can’t use Store in the following places:
As the return type of this function.
As the type of cache variable in PersonRepository.
We have two options to get around this restriction.
1) Forget about the interface approach and go back to using the concrete type directly - just like in the problem statement. 2) Create a type eraser that acts as a wrapper over our concrete types.
As you can tell from the less than positive wording of 1 I’m not going to go that route in this post. Again if this is the right solution for your code base then go ahead and use it.
The mechanics of what we will do is:
A) Create a concrete type which follows the naming convention of adding Any to the beginning of our type e.g. AnyStore. B) The AnyStore will be generic over the key’s type where Key: Hashable. C) When instantiating an AnyStore<Key> you will need to provide an instance to wrap, which will need to conform to Store. D) Replace references to Store within function return types or variable declarations with our new AnyStore<Key> type.
Line 1 is defining our new type and stating that it’s generic over a Key type that must be Hashable.
Lines 5-8 is where most of the heavy lifting is done. We are taking in another concrete type that conforms to Store and grabbing all of it’s functions and placing them into some variables 2-3.
By doing this it means that we can implement the Store interface get(key:) and set(key:value:) and then delegate to the functions that we captured.
With this in place we move onto updating any place where Store was mentioned as a return type or a variable’s type and change to use our new type eraser.
- public func makeTransientStore() -> Store {
-     return TransientStore()
- }
+ public func makeTransientStore<Key>() -> AnyStore<Key> {
+     return AnyStore(TransientStore())
+ }
  final class PersonRepository {
-     let cache: Store
+     let cache: AnyStore<String>

-     init(cache: Store = makeTransientStore()) {
+     init(cache: AnyStore<String> = makeTransientStore()) {
          self.cache = cache
      }

      func fetch(id: String) -> Person? {
          return cache.get(key: id).flatMap { try? JSONDecoder().decode(Person.self, from: $0) }
      }

      func store(id: String, person: Person) {
          cache.set(key: id, value: try? JSONEncoder().encode(person))
      }
  }
There were surprisingly few changes required to get this to work.
What did we just do?
Let’s look at the public interface for the Storage module:
  public protocol Store {
-     public func get(key: String) -> Data?
-     public func set(key: String, value: Data?)

+     associatedtype Key : Hashable

+     public func get(key: Key) -> Data?
+     public func set(key: Key, value: Data?)
  }

+ public class AnyStore<Key: Hashable>: Store {
+     public init<Concrete: Store>(_ store: Concrete) where Key == Concrete.Key
+     public func get(key: Key) -> Data?
+     public func set(key: Key, value: Data?)
+ }

- public func makeTransientStore() -> Store
+ public func makeTransientStore<Key: Hashable>() -> AnyStore<Key>
We’ve had to expose a new concrete type AnyStore in order to accommodate the fact that we wanted Store to be generic. Exposing a new concrete type may seem at odds with the idea of relying on abstractions over concretions but I tend to think of this kind of type erasure as a fairly abstract wrapper that exists solely to hide concrete implementations.
Expanding our Type Erasure
To really ground our understanding let’s make our Store abstraction more powerful and make it work for any value that is Codable instead of just working with Data.
The current method of working with Data directly pushes complexity onto the clients of our Store API as they have to handle marshalling to and from Data.
First let’s see how this change will actually simplify our API usage:
To make the above work here’s the modifications required to add the new generic to the Store protocol and feed it through our AnyStore type eraser:
- public class AnyStore<Key: Hashable>: Store {
-     public init<Concrete: Store>(_ store: Concrete) where Key == Concrete.Key
-     public func get(key: Key) -> Data?
-     public func set(key: Key, value: Data?)
- }
+ public class AnyStore<Key: Hashable, Value: Codable>: Store {
+     public init<Concrete: Store>(_ store: Concrete) where Key == Concrete.Key, Value == Concrete.Value
+     public func get(key: Key) -> Value?
+     public func set(key: Key, value: Value?)
+ }

  public protocol Store {
      associatedtype Key: Hashable
+     associatedtype Value: Codable

-     public func get(key: Key) -> Data?
-     public func set(key: Key, value: Data?)
+     public func get(key: Key) -> Value?
+     public func set(key: Key, value: Value?)
  }

- public func makeTransientStore<Key: Hashable>() -> AnyStore<Key>
+ public func makeTransientStore<Key: Hashable, Value: Codable>() -> AnyStore<Key, Value>
Conclusion
That was a lot to go through and it got pretty difficult at the end. I covered a few different methods for testing that have various tradeoffs but are all useful for helping to test across boundaries to ensure that objects are collaborating correctly.
Hopefully the above will demonstrate some of the techniques that can be used to design clean boundaries without compromising because we couldn’t figure out a way to test things.