Tying things together
09 Mar 2019This post is an attempt to tie together a lot of related thoughts I’ve had and written about for a long time. The high level idea is to take our clean well modularised code and reuse it in interesting ways.
I take a networking client written in a reusable way that enables us to build an iOS application, a command line interface (CLI) and a website. In this post the CLI and website are not for production use - they are for debugging and pro-active monitoring, to support the iOS application.
Overview
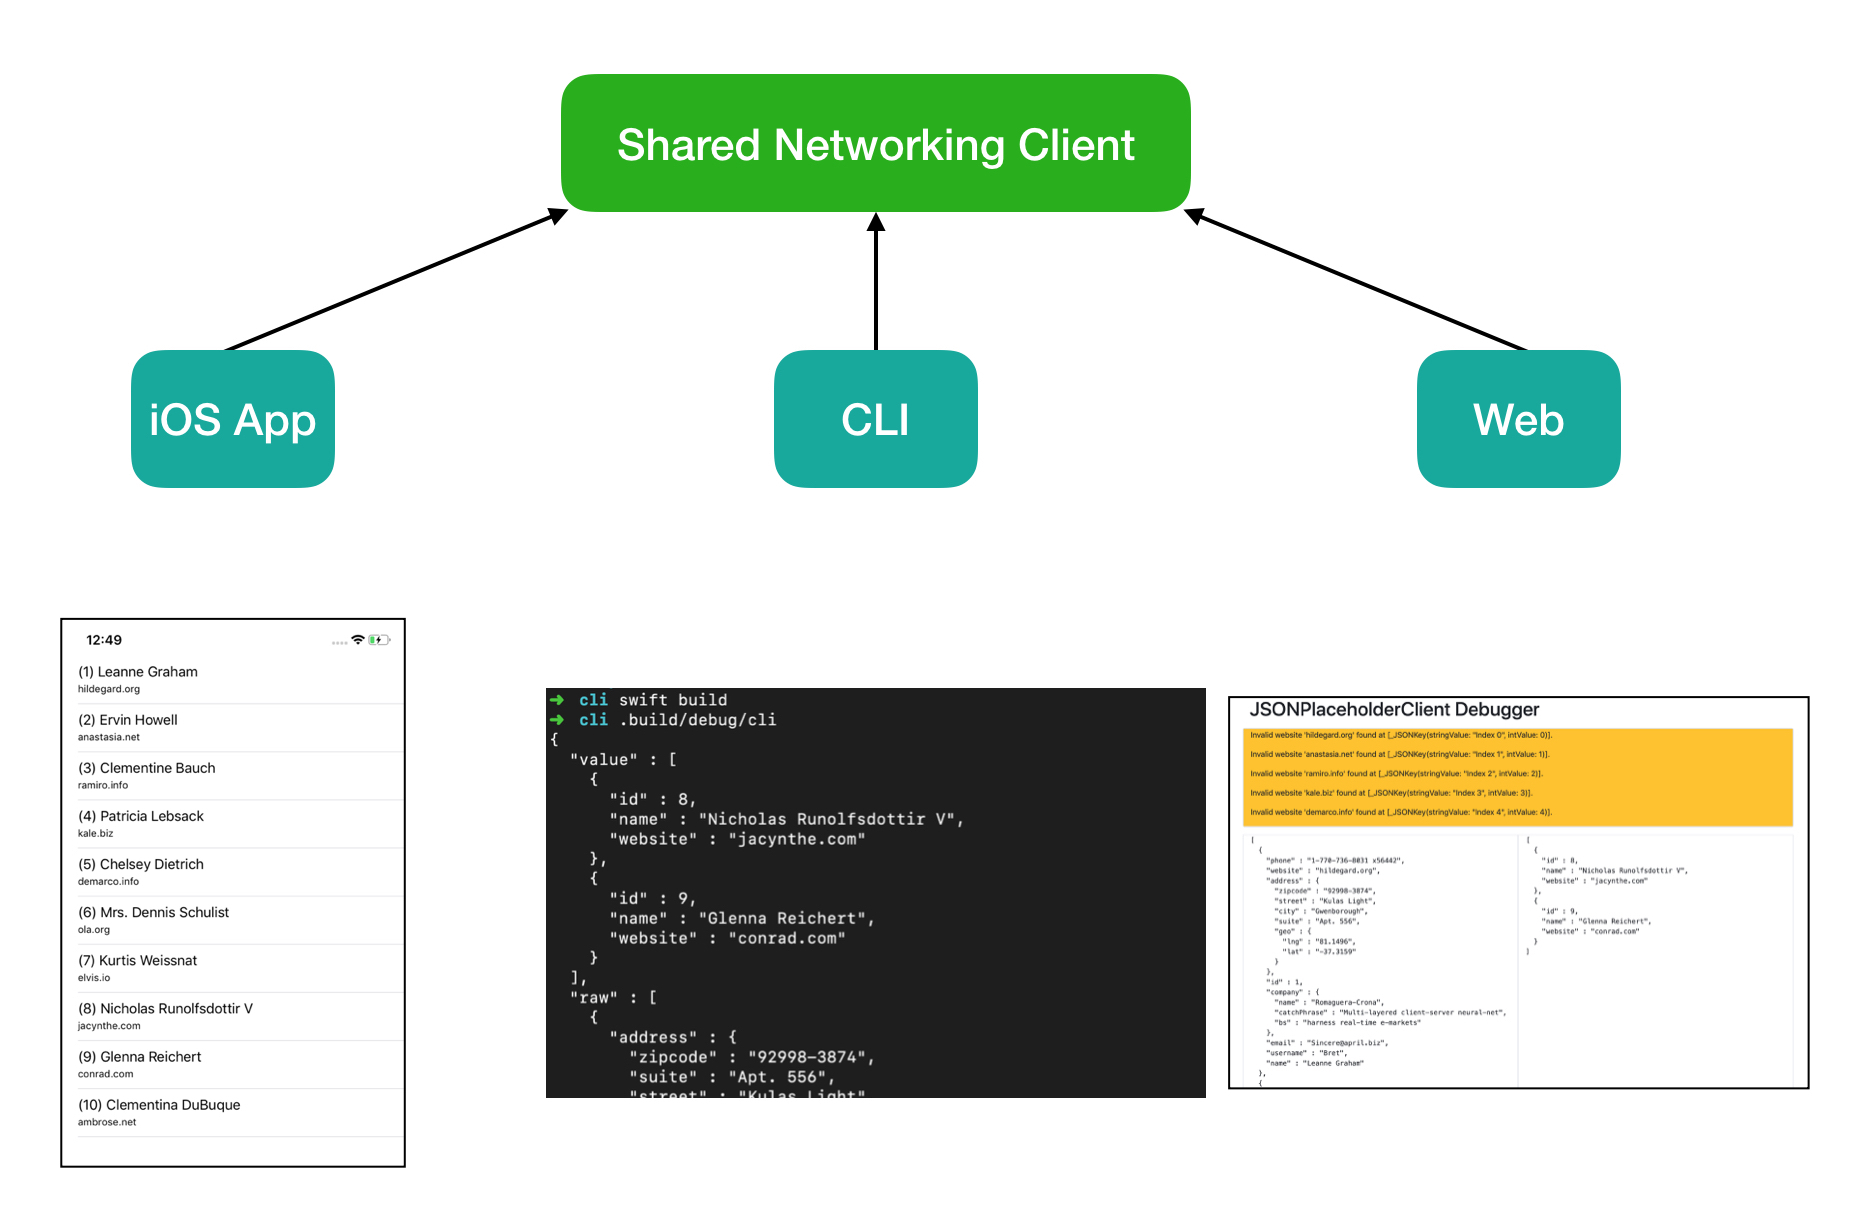
In the linked Github repo I’ve built the following structure.

There is a shared component and then 3 front ends built on top of it. The high level pattern in each front end is:
- Utilise the Networking Client to fetch
[Person]instances. - Transform
[Person]instances into a representation that is appropriate for each front end- iOS uses a table view
- cli uses pretty printed JSON
- web uses HTML
Why bother?
Before diving into any code it’s probably worth looking a bit more at why we would want to do this.
Why make a website?
Imagine getting a call out because your app is not displaying all the data it should from the backend. To debug you might need to do at least these two things:
1) Check the backend data manually
2) Run the app in the debugger to explore the data
The first of these can actually be fairly tricky to do.
You might be a master with curl but not all APIs are easy to inspect; perhaps there is encryption, authentication, specific headers are required or there is a lot of link traversal.
This brings you to the second type of debugging, which can be slow and painful. Depending on how you have programmed your decoding it may not be easy to figure out why data is being discarded. This topic is something I touched on in Handling bad input with decodable.
Now imagine if you could instead just navigate to a website that uses your production code and displays all errors. How much time would that save?
Why make a CLI?
Giving your code a CLI gives you the ability to programmatically interact with it from a lot of different contexts. Imagine writing a tool that will pro-actively monitor the usage of your code and reports automatically when there are issues. At this point you can find issues before your customers do.
Pushing further upstream - you could provide your CLI to the team who manages the backend so that they can add it to their CI pipelines. By adding your production code to their CI pipelines you can be assured that any releases they do will now never break your application.
The above just scratches the surface of what you can do but hopefully it provides enough motivation to read on.
The shared client
In order to keep the examples on Github as simple as possible I’ve put all of the shared code into a single module.
The networking client has the following interface:
public protocol JSONPlaceholderClient {
    public typealias Cancellation = () -> Void

    public func fetch(completion: @escaping (Result<Decoded<[Person]>>) -> Void) -> Cancellation
}
This provides a single function that will fetch some people from jsonplaceholder.typicode.com.
The result makes use of an odd looking type called Decoded that I briefly covered at the bottom of Handling bad input with decodable.
As a recap it looks like this:
  enum Decoded<T: Decodable>: Decodable {
    case debug(value: T, raw: AnyCodable, errors: [Error])
    case prod(value: T)
}
The reason for this type is that I ideally want my debugging tools to use the production code.
This type allows you provide a single API (the fetch function) that can return just the data you need in production and richer debug data when you ask for it.
I’ve toyed with the idea of just having two functions called fetch that have different completion handlers with the data required but it’s not a generic solution and it’s easy for the two methods to get out of sync.
In order to change whether you get debug or prod data you configure the client when you create it using a factory function:
func makeClient(debugEnabled: Bool = false) -> JSONPlaceholderClientIf you want to poke around the shared framework some more you can find it here on Github.
Basic CLI
My project on Github is structured like this:
.
├── app
├── cli
├── shared
└── web
I’ve created the CLI in the cli folder and then used Swift Package Manager’s ability to reference a package by path to import the Shared module.
The simplest Package.swift to get started looks like this:
// swift-tools-version:4.2

import PackageDescription

let package = Package(
    name: "cli",
    dependencies: [
         .package(path: "../Shared"),
    ],
    targets: [
        .target(name: "cli", dependencies: [ "Shared" ]),
    ]
)
My networking client only has one method so I don’t need a super complicated CLI. The following does the job quite simply:
1
2
3
4
5
6
7
8
9
10
11
12
13
14
15
16
17
18
19
20
21
22
23
24
25
26
import Foundation
import Shared

_ = makeClient(debugEnabled: true).fetch { result in
    let encoded = result.flatMap { value -> Result<String> in
        do {
            let encoder = JSONEncoder()
            encoder.outputFormatting = .prettyPrinted

            return .success(String(data: try encoder.encode(value), encoding: .utf8) ?? "")
        } catch {
            return .failure(error)
        }
    }

    switch encoded {
    case .success(let value):
        print(value)
        exit(EXIT_SUCCESS)
    case .failure(let error):
        print(error)
        exit(EXIT_FAILURE)
    }
}

dispatchMain()
Line 4 creates my client with debugEnabled: true - this is really important as we want as much data as possible in order to debug issues.
Lines 5-14 are creating a pretty printed JSON string representation of the data, this will be the simplest format for interoperating with other tools. Imagine piping this to the input of other tools on the command line.
Line 26 is what keeps this app running so that we can perform our asynchronous networking.
Lines 16-23 perform the duty of printing our output and exiting with the correct status code.
That’s it for a basic CLI - this was extremely painless to create but now opens up a lot of possibilities. We can access the data in the exact same way that out iOS application does using the same networking and serialisation code.
Running this tool looks something like this (this JSON is heavily edited as it’s long):
➜  cli swift build
➜  cli .build/debug/cli
{
  "value" : [
    {
      "id" : 8,
      "name" : "Nicholas Runolfsdottir V",
      "website" : "jacynthe.com"
    },
    ...
  ],
  "raw" : [
    {
      "id" : 8,
      "name" : "Nicholas Runolfsdottir V",
      "website" : "jacynthe.com",
      ...
    },
    ...
  ],
  "errors" : [
    "Invalid website 'hildegard.org' found at [_JSONKey(stringValue: \"Index 0\", intValue: 0)].",
    ...
  ]
}
The interesting thing to note about this JSON is that there are 3 top level keys value, raw and errors.
These correspond to the app’s decoded representation, the raw JSON representation and any decoding errors respectively.
Basic website
In this example I use Vapor - the idea is that I can provide a slightly more human friendly user interface that can be deployed in a docker container. The website will again leverage the exact same production code used within the iOS application but it will be in debug mode.
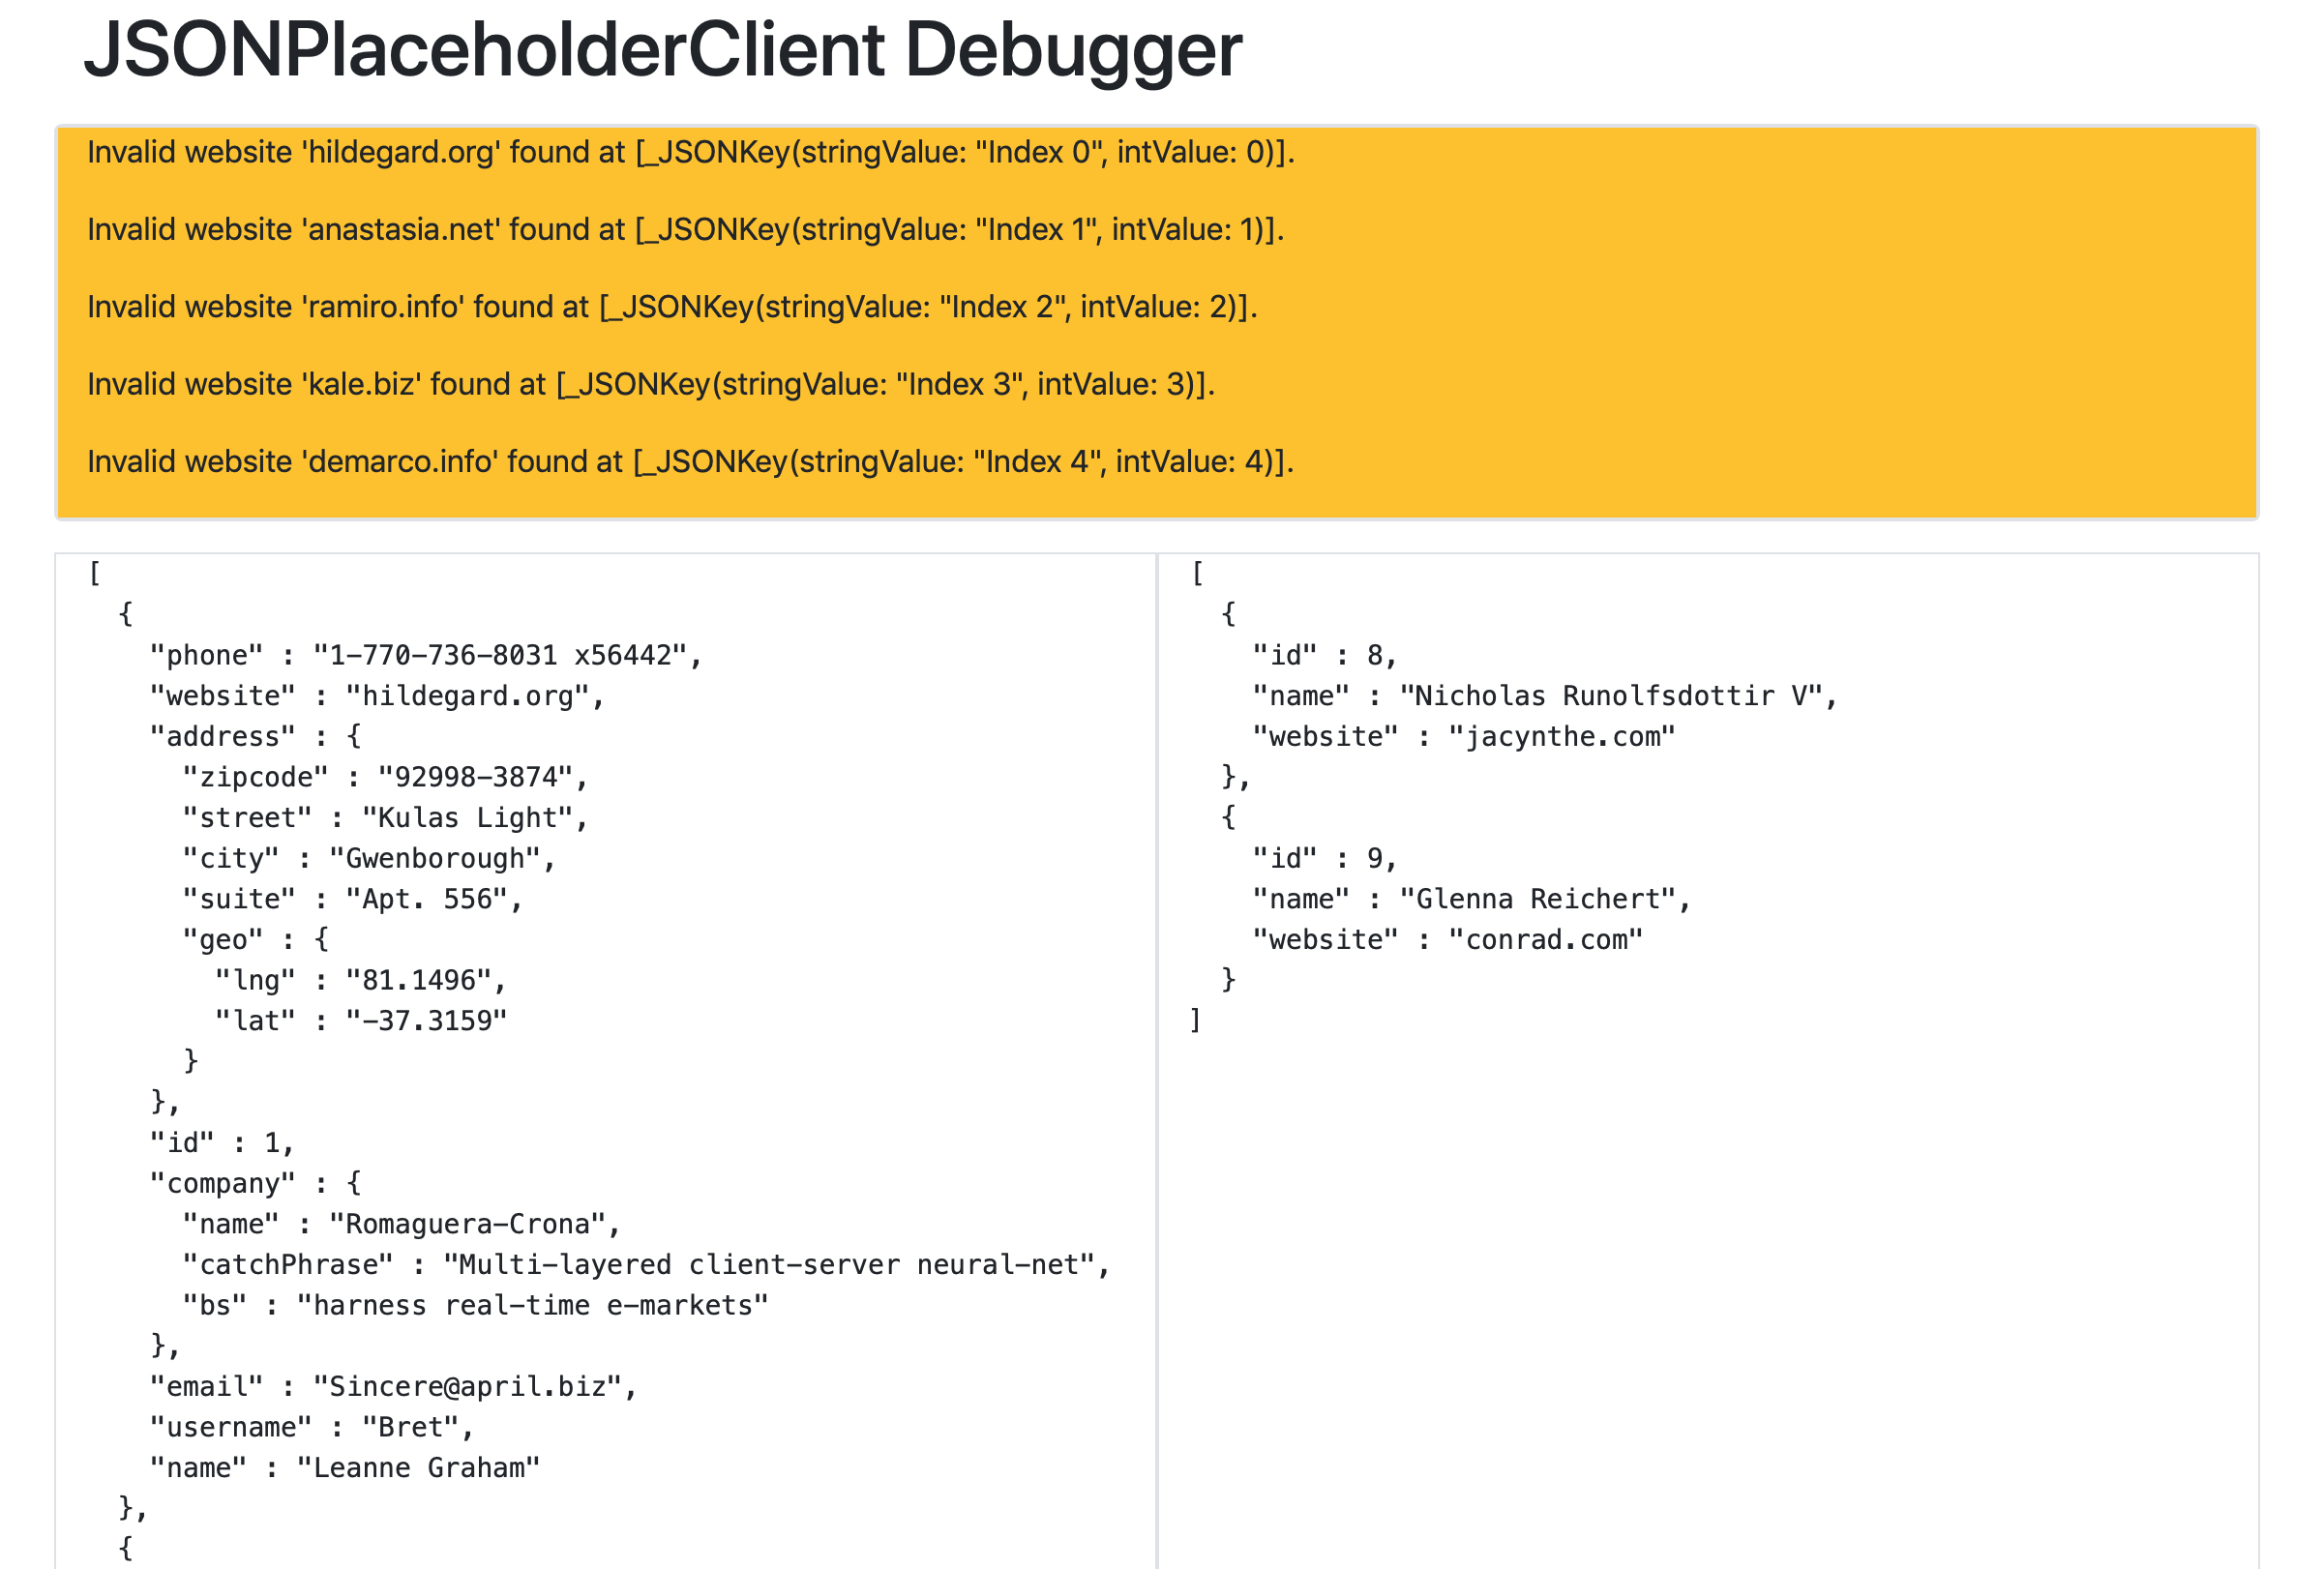
Here’s what the end result looks like:

It’s not pretty but it’s functional.
There are 3 sections:
- On the top we have the errors that were output during serialisation
- On the left we have the raw input data
- On the right we have the decoded data as the app sees it
In the screenshot above we can see that a lot of users are not being parsed due to some website error. On the left hand side we could now inspect the raw data and compare against the items that were parsed. This should make debugging much much simpler.
I’m not going to lie the building of the website is more involved than building the CLI. The principle is the same as the CLI in that we are reusing our client and essentially mapping from the client’s representation of a result to a HTML representation.
To do this I’ve registered a single route that will run a single function called Index.action.
import HtmlVaporSupport
import Shared
import Vapor

public func routes(_ router: Router) throws {
    router.get(use: Index.action)
}
The Index.action function does the conversion from our shared libraries completion handler to Vapor’s promises:
1
2
3
4
5
6
7
8
9
10
11
12
13
14
15
import HtmlVaporSupport
import Shared
import Vapor

enum Index {
    static func action(_ request: Request) -> Future<Node> {
        let promise = request.eventLoop.newPromise(Node.self)

        _ = makeClient(debugEnabled: true).fetch { result in
            promise.fulfil(result.flatMap(prepare).map(render))
        }

        return promise.futureResult
    }
}
This function actually looks simpler than the CLI but that is purely because I have moved prepare and render out to different files.
Due to the added complexity of rendering for the web I’ve made prepare act like a presenter that is just preparing data to be shown.
Then render is where the prepared data is essentially pushed into the HTML template.
Conclusion
This is one example use case or creating new tools that utilise your code in new and interesting ways. I’ve put up a Github repo that demonstrates all of the things mentioned, so anyone should be able to clone and play around with the concept to see how it all hangs together.